Once you’ve set up a Data Consumer, you are ready to start sharing Data Products. This guide will help you quickly share data.
SCHEDULING DATA PRODUCTS KNOWN LIMITATIONS:
• Scheduled Data Products are currently supported for File Storage, Snowflake, and Databricks destinations.• Support for additional Data Warehouse destinations (such as BigQuery) is planned for future releases.
• If scheduling isn’t available in your environment, please contact your account representative.
Sharing Data Products setup instructions
Step 1: Choose Data Products
.png)
In the Bobsled Application, locate and select the Data Fulfillment Tab, then select the data consumer you’re wishing to share a Data Product with, and click the ‘+ Share data’ button.
In the wizard, select the Data Products to share and click “Continue”.
Step 2: Review and optionally customize Data Products
.png)
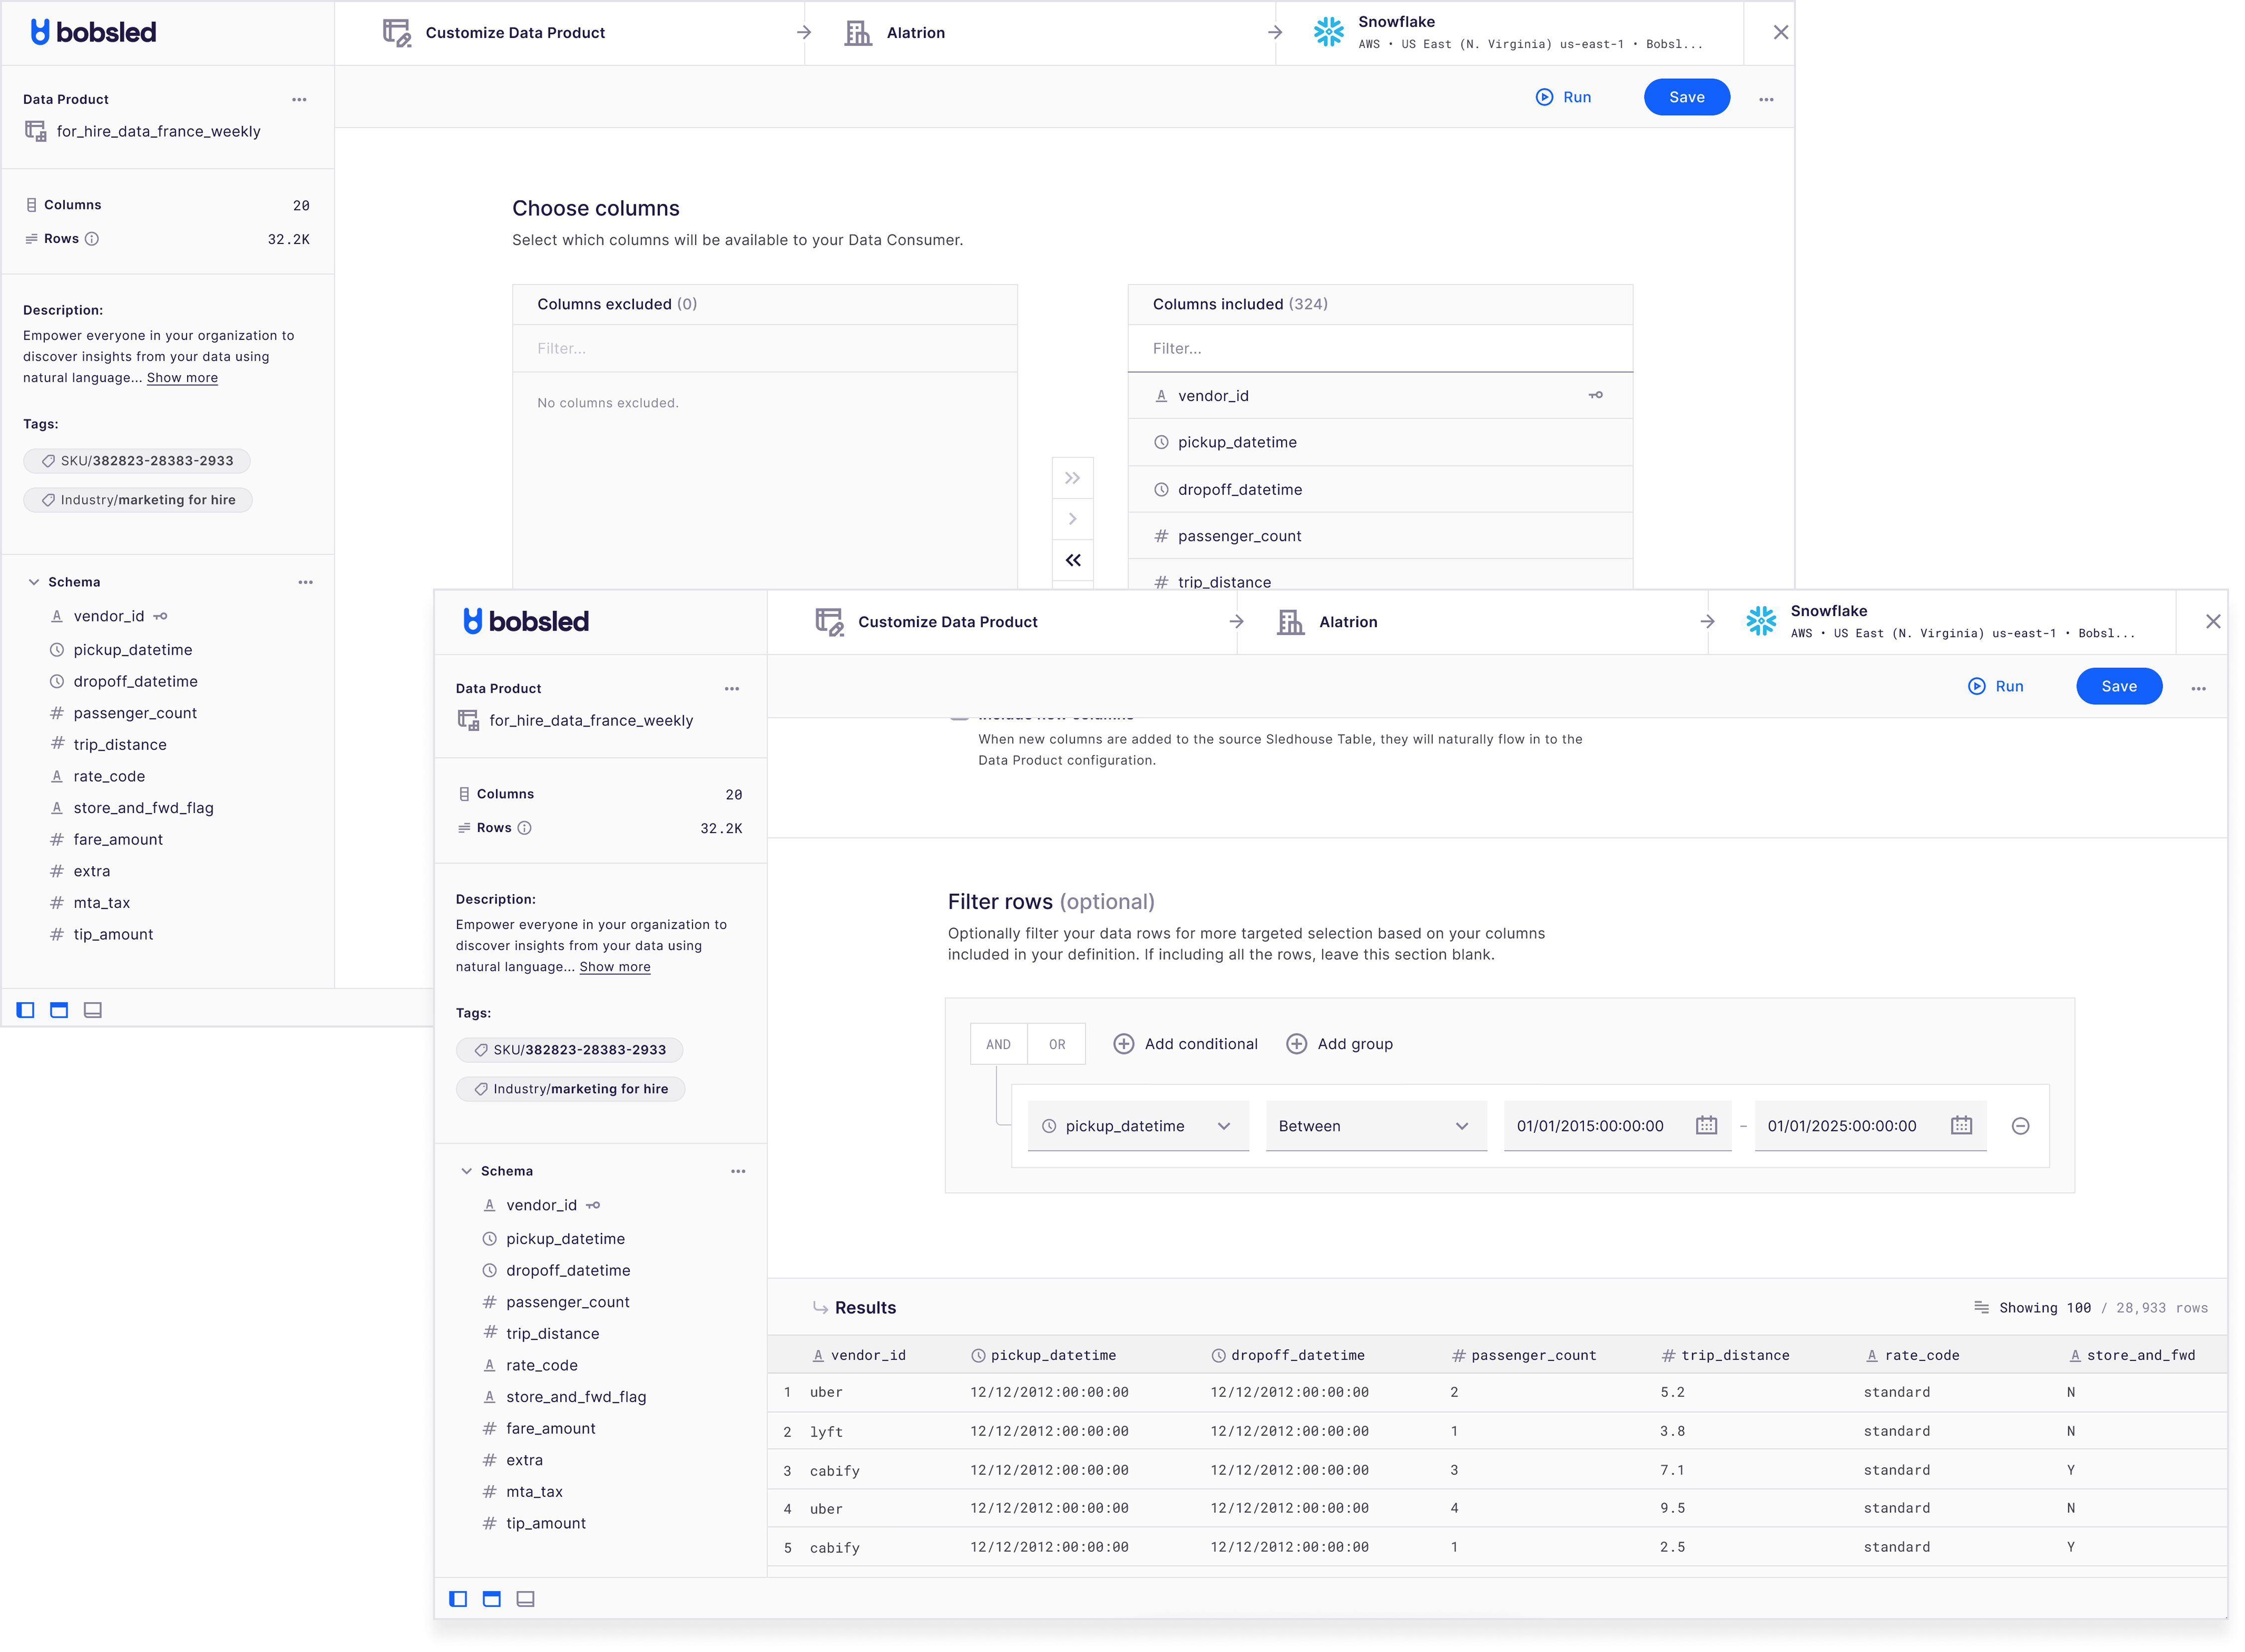
On the Review screen, Bobsled allows you to customize Data Products before fulfillment. This is useful when a Data Consumer is only entitled to a subset of a Data Product. Bobsled categorizes fulfilled Data Products into two types:
Standard: The full Data Product as originally defined, with no modifications.
Custom: A tailored version of the Data Product that can include row-level filters, column selections, and time-based filters to control how much data is shared and how quickly it becomes available to users.
To customize a Data Product, click the customization icon on the Review screen. This opens a workbench displaying the product’s metadata.
You can choose to customize the Data Product using either:
A no-code Query Designer, or
The SQL Editor, depending on your preference.
NOTE:
• Customizing a Data Product uses the same functionalities as definfining one—either trhough the Query Designer or the SQL editor.
TIP:
• You can override the target name of your data product if the Data Consumers prefers for a different name.
Make your changes, then click ‘Run’ to preview the results.
TIP:
• If you’ve customized a Data Product and wish to discard the customization, locate and click the ‘undo’ arrow. You will get a confirmation dialog box to confirm if you wish to proceed.
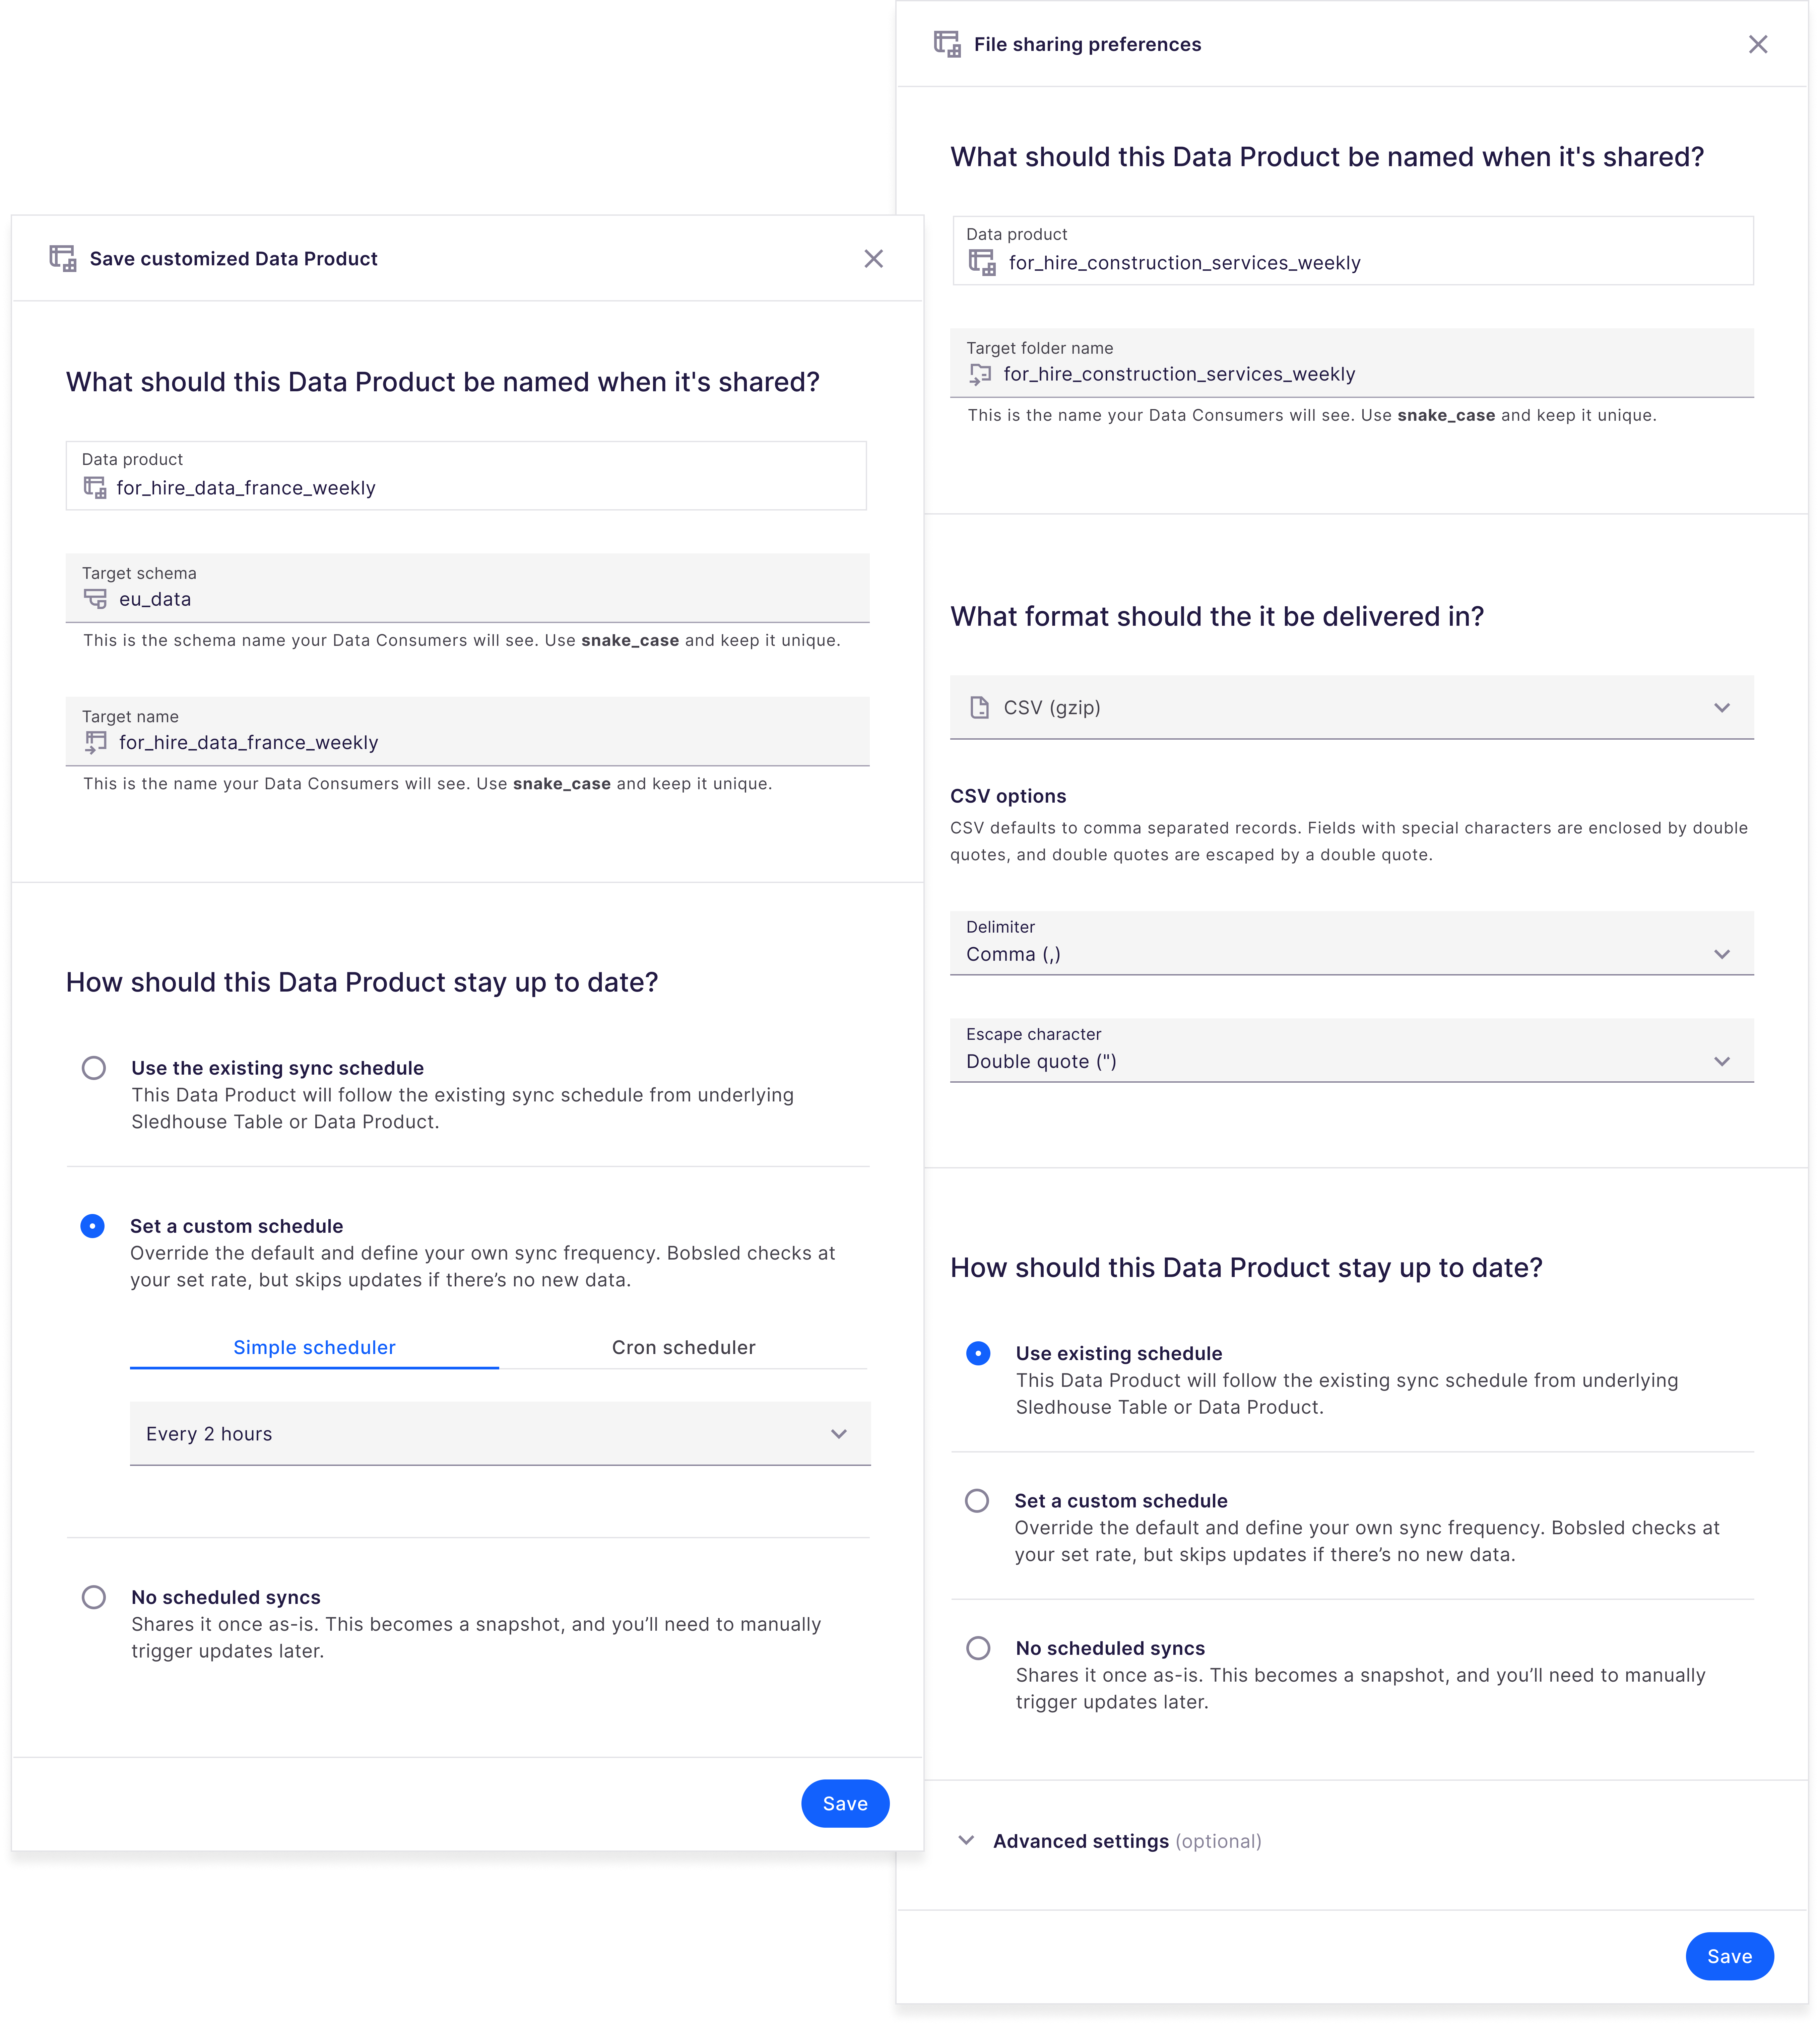
When done customizing, click ‘Save’. A modal will be displayed with additional sharing configurations that you can override:
Default target values:
For Cloud Data Warehouse: override the
schemaandtarget nameFor File Storage destinations, override the
target folder name,file formatunload options, andwriting optionsunder advanced settings.
Default scheduling options: These allow you to override the base Data Product's schedule to provide different refresh frequencies. This enables you to offer tiered pricing based on data delivery frequency or accommodate different customer needs from the same base Data Product.
Use the base Data Product's schedule (default)
Set a different custom schedule (simple interval or CRON)
Set to "no scheduled syncs" (snapshot) for one-time delivery
Click Save to apply the customization.
TIP:
• If you want to share the Data Product as-is but just want to override the schedule or target names, select the Query Designer option and select save.• Schedule overrides are completely independent—the base Data Product keeps its original schedule, while the customized version follows its own.
NOTE:
• Sharing a custom schedule Data Product to Snowflake destination requires a Local Copy enabled. Bobsled will alert you when you attempt to fulfill.
• When you add a customized Data Product to a share for the first time, it syncs immediately. After that initial sync, it follows your configured schedule.
• Changing a Custom Data Product's schedule from a recurring schedule to "snapshot" (in Snowflake) will drop the view and create a table. This is expected behavior and preserves your data.
5. Once you’re happy with your Data Consumer fulfillment, click the ‘Share’ button. You’ve now successfully shared Data Products in Sledhouse!
.png)
Monitoring data fulfillment
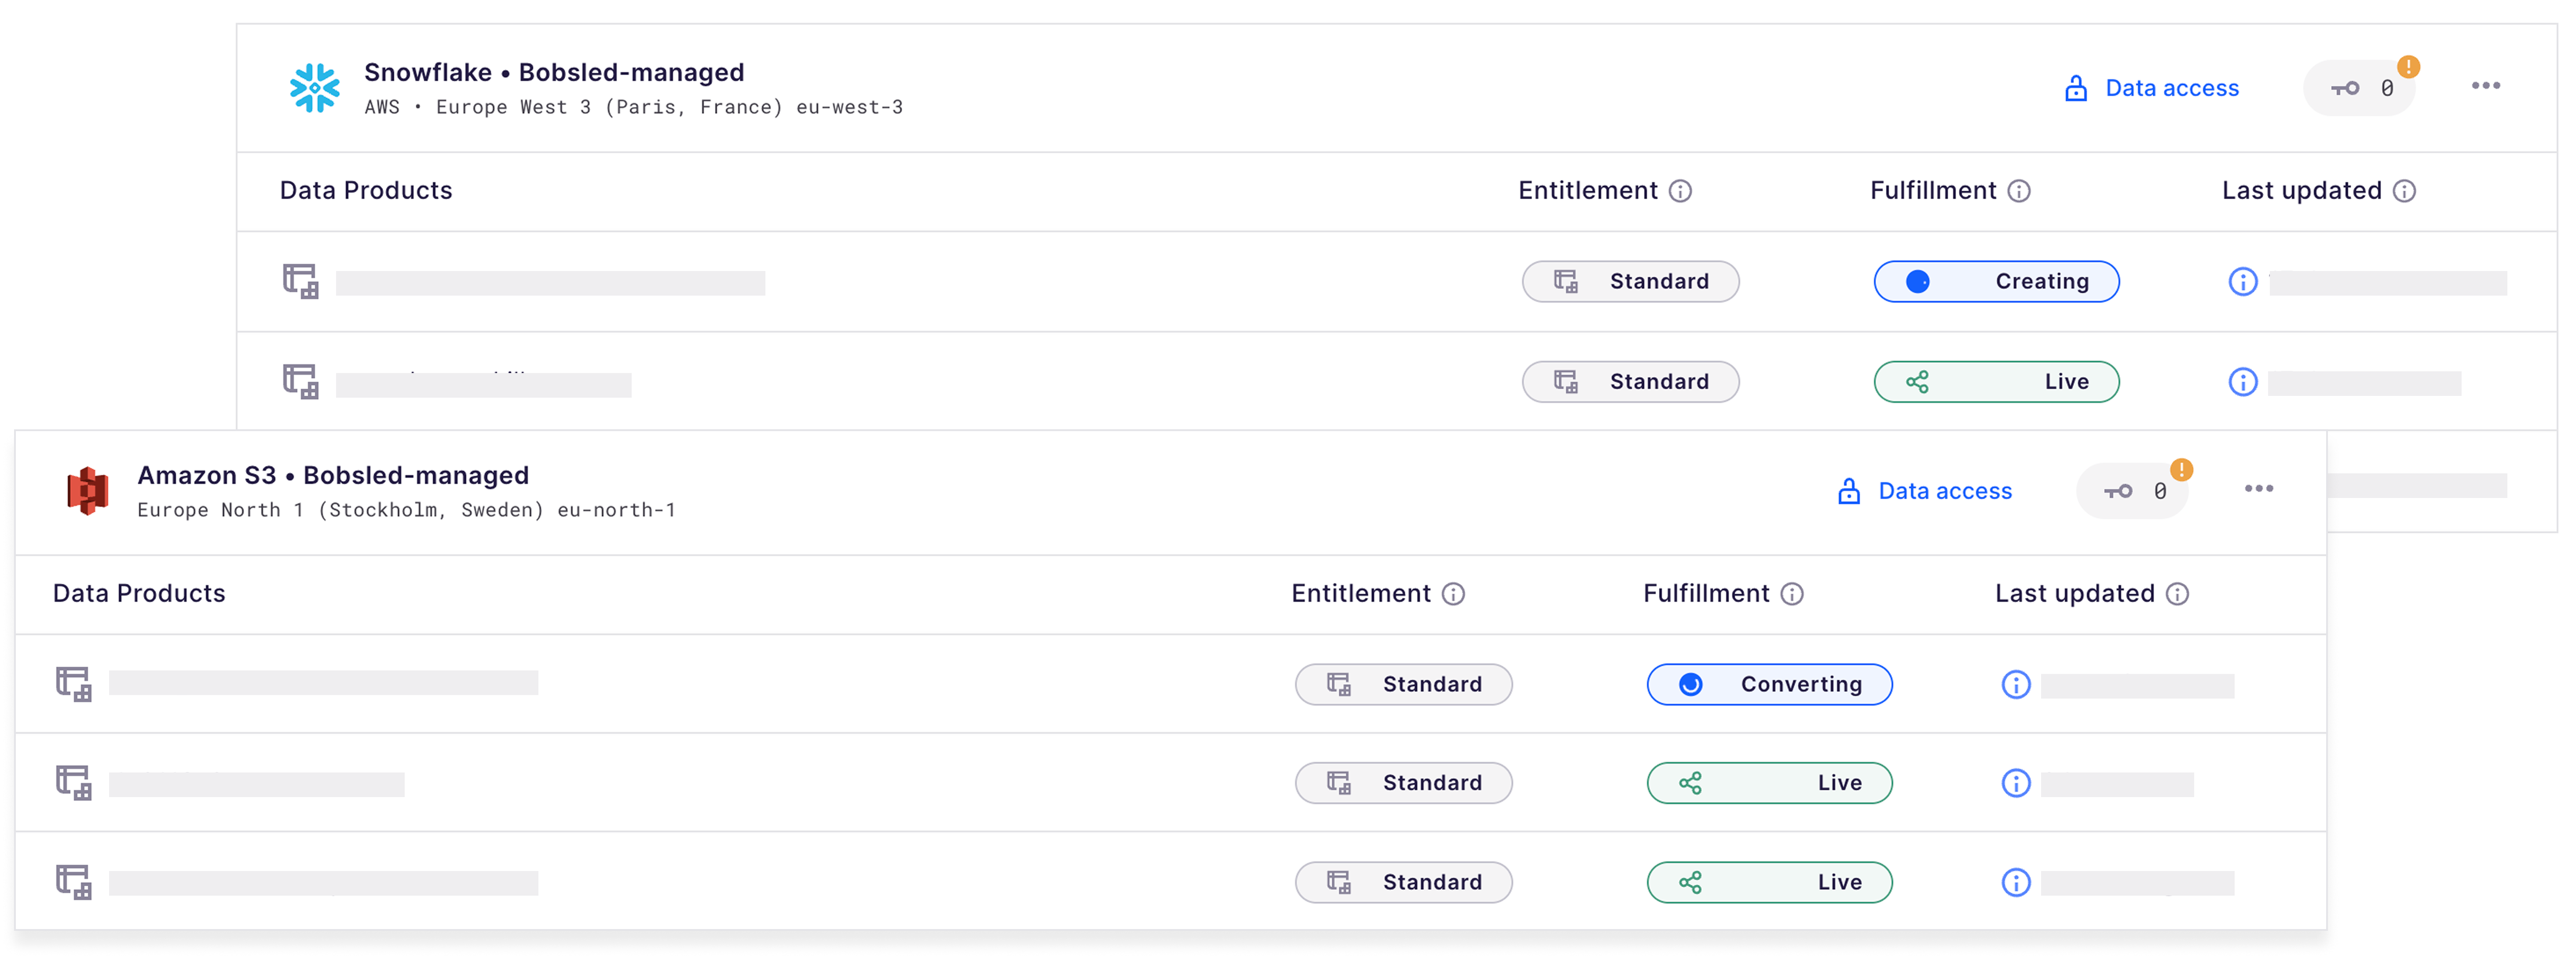
Locate the Data Consumer you want to monitor and select it.
For each destination the consumer has access to, you can view the current fulfillment status. Alternatively, go to the Logs tab to review the fulfillment history.
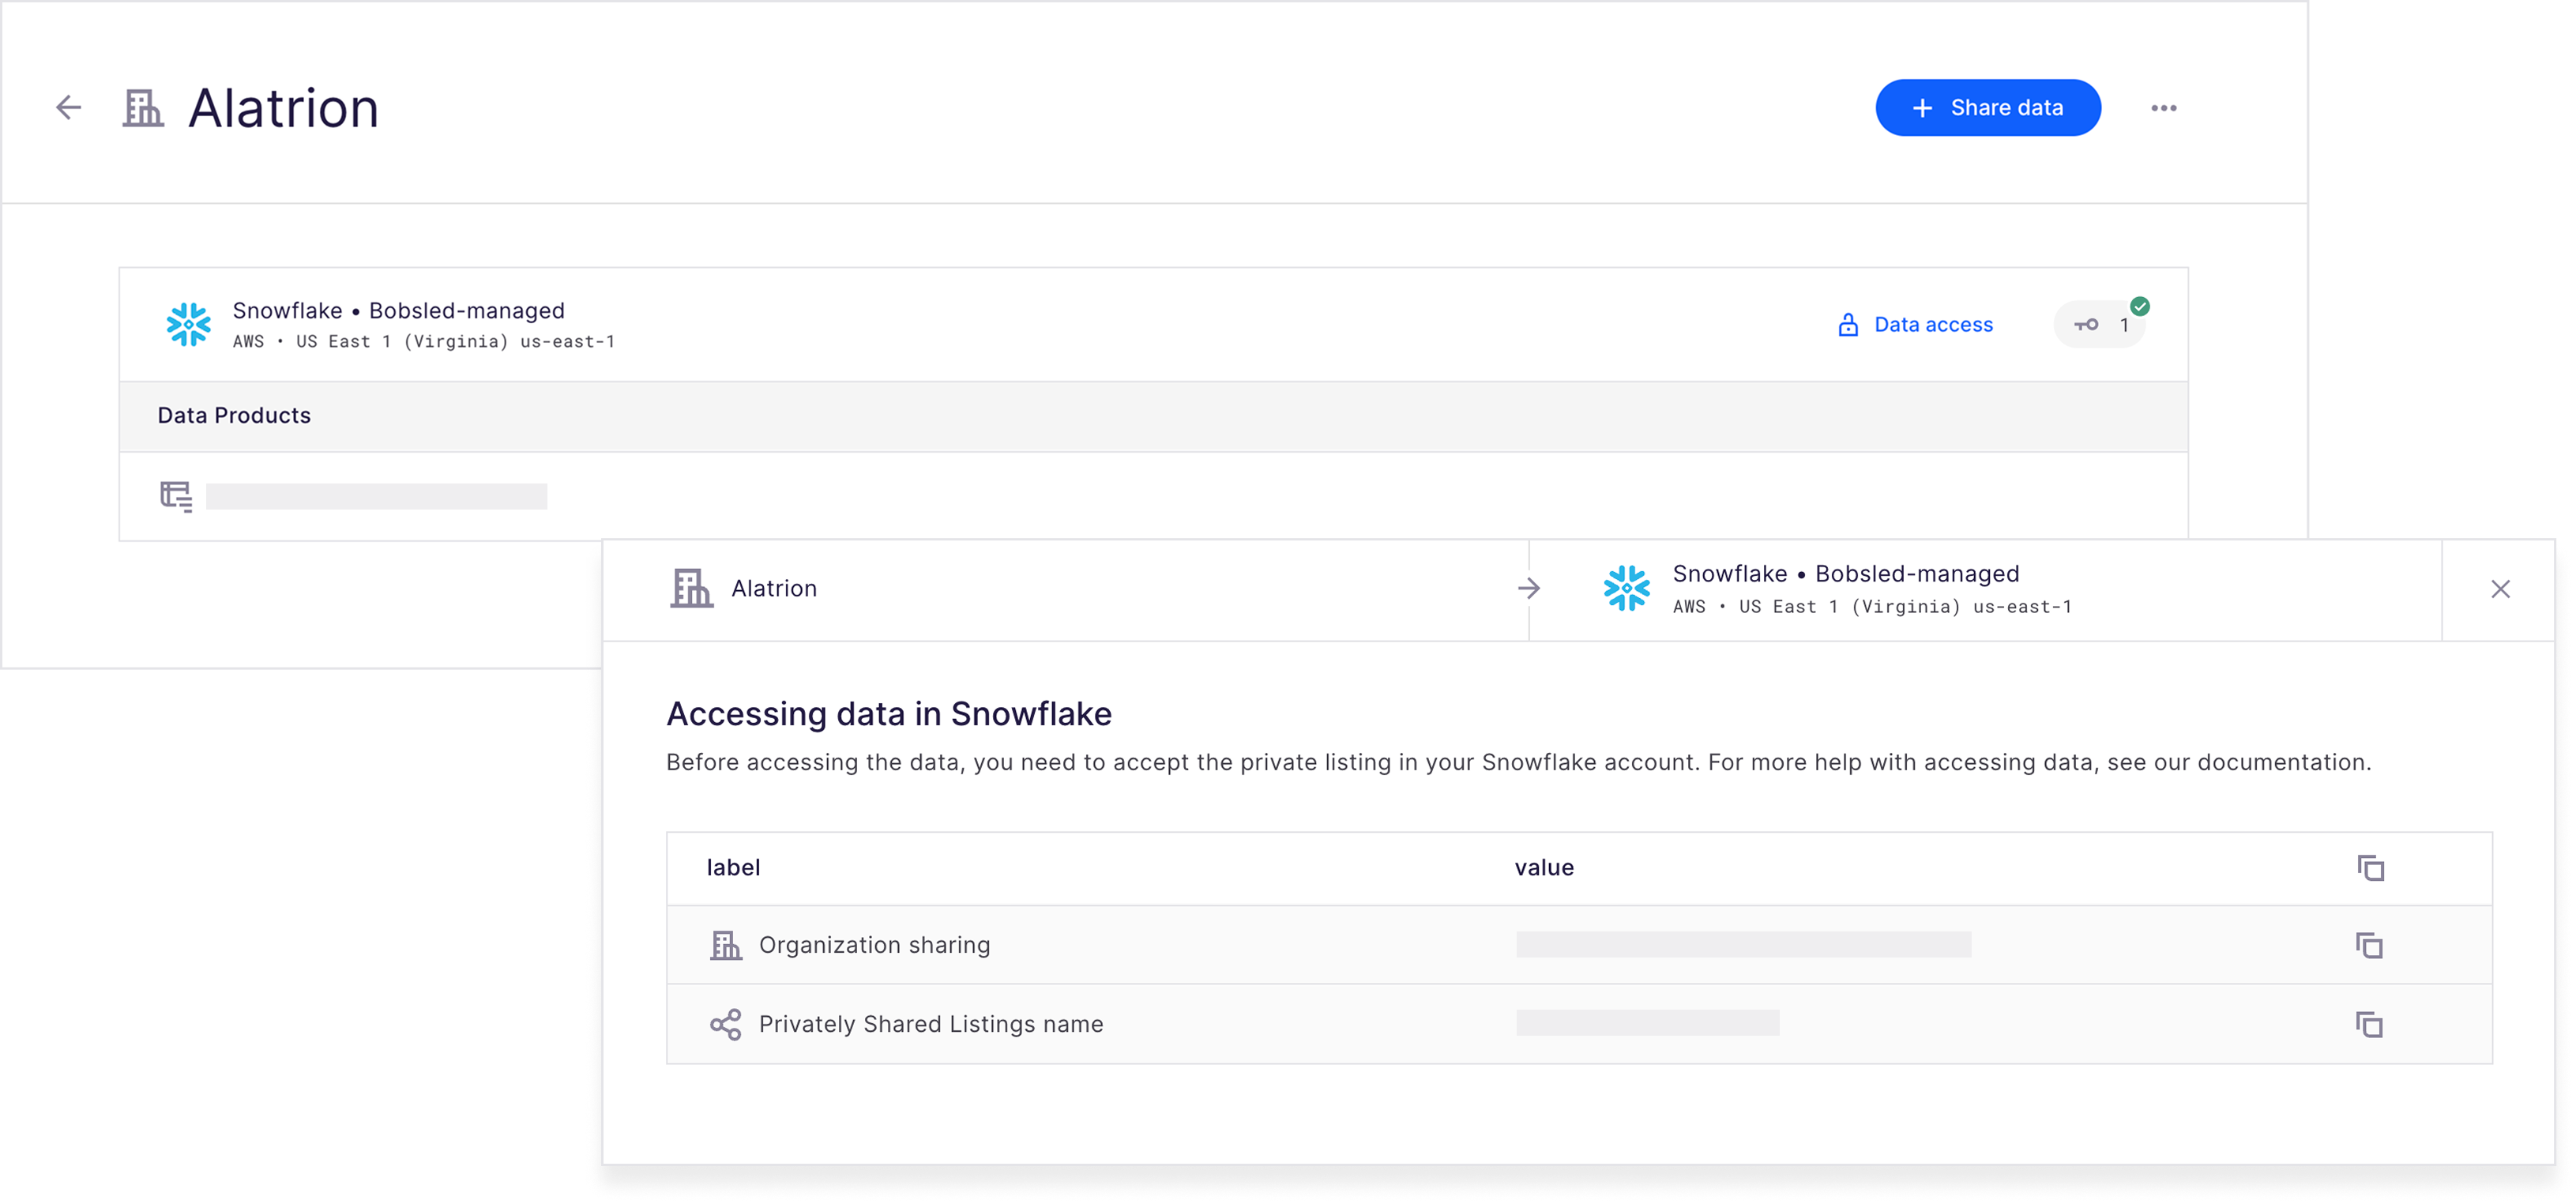
Accessing data
To get information on how to access the data and share that information with your consumer. You can click on the “Data Access” button. Depending on the destination, it will show you the relevant information that you can share with your consumer on how to access the data. Example for Snowflake below
Editing and unsharing Data Products
In the Bobsled Application, locate and select the Data Fulfillment Tab, then select the data consumer you wish to manage the Share, and click the ‘Edit data share’ button.
In the wizard, select more (or deselect) Data Products and click ‘next’.
If you wish to make further changes to the Data Product’s rows, columns, or scheduling options, select the ‘customize’ button and apply the desired changes.
Once happy, select the ‘Save’ button.
NOTE:
• Unsharing a Data Product is instantaneous in the target destination. Your Data Consumer will have its access instantly revoked.