Bobsled offers multiple ways to ensure data is correctly and efficiently replicated across different destinations. When sharing your data with Bobsled, whether it’s from a file storage or a cloud data warehouse source, it’s useful to remember which replication patterns are available to ensure your data reaches your consumers.
This article describes the steps to create a data transfer within a share and how to monitor it.
IN PUBLIC PREVIEW:
• Monitoring a data transfer ↓
Prerequisites
A Share must be created.
To successfully create a data transfer in a share, you must have at least one Data source preconfigured in Bobsled.
If you’re sharing data with a Bobsled-managed destination, you only need to pick where you want your data to be shared. Sharing to an externally managed destination may require more details before you are ready to start creating a transfer. Check our supported Destinations for more information.
NOTE:
What you can see and do will differ based on your role and permissions.
Data transfer setup instructions
Creating a data transfer in Bobsled comprises three main steps:
Choose data to share: Choose paths from File storage sources or choose objects from a Cloud Data Warehouse source
Configure loading/replication patterns: Configure how Bobsled should load/replicate your data—not applicable for Files Storage source to File Storage destinations
Review data transfer: Set sync intervals and schedule
These will vary depending on your source–destination combination and will render a different morphology to guarantee maximum control and flexibility.
File Storage sources to Cloud Data Warehouse destinations
When selecting data from your source, Bobsled will map each unique selection to an individual table.
By default, if you select 3 paths, 3 tables will be loaded to the destination.
Bobsled generates the default name of the table based on your source selection. E.g.,
S3://source_path/data_package_1/data_2020/will translate into one table, nameddata_2020.
Step 1: Choose data
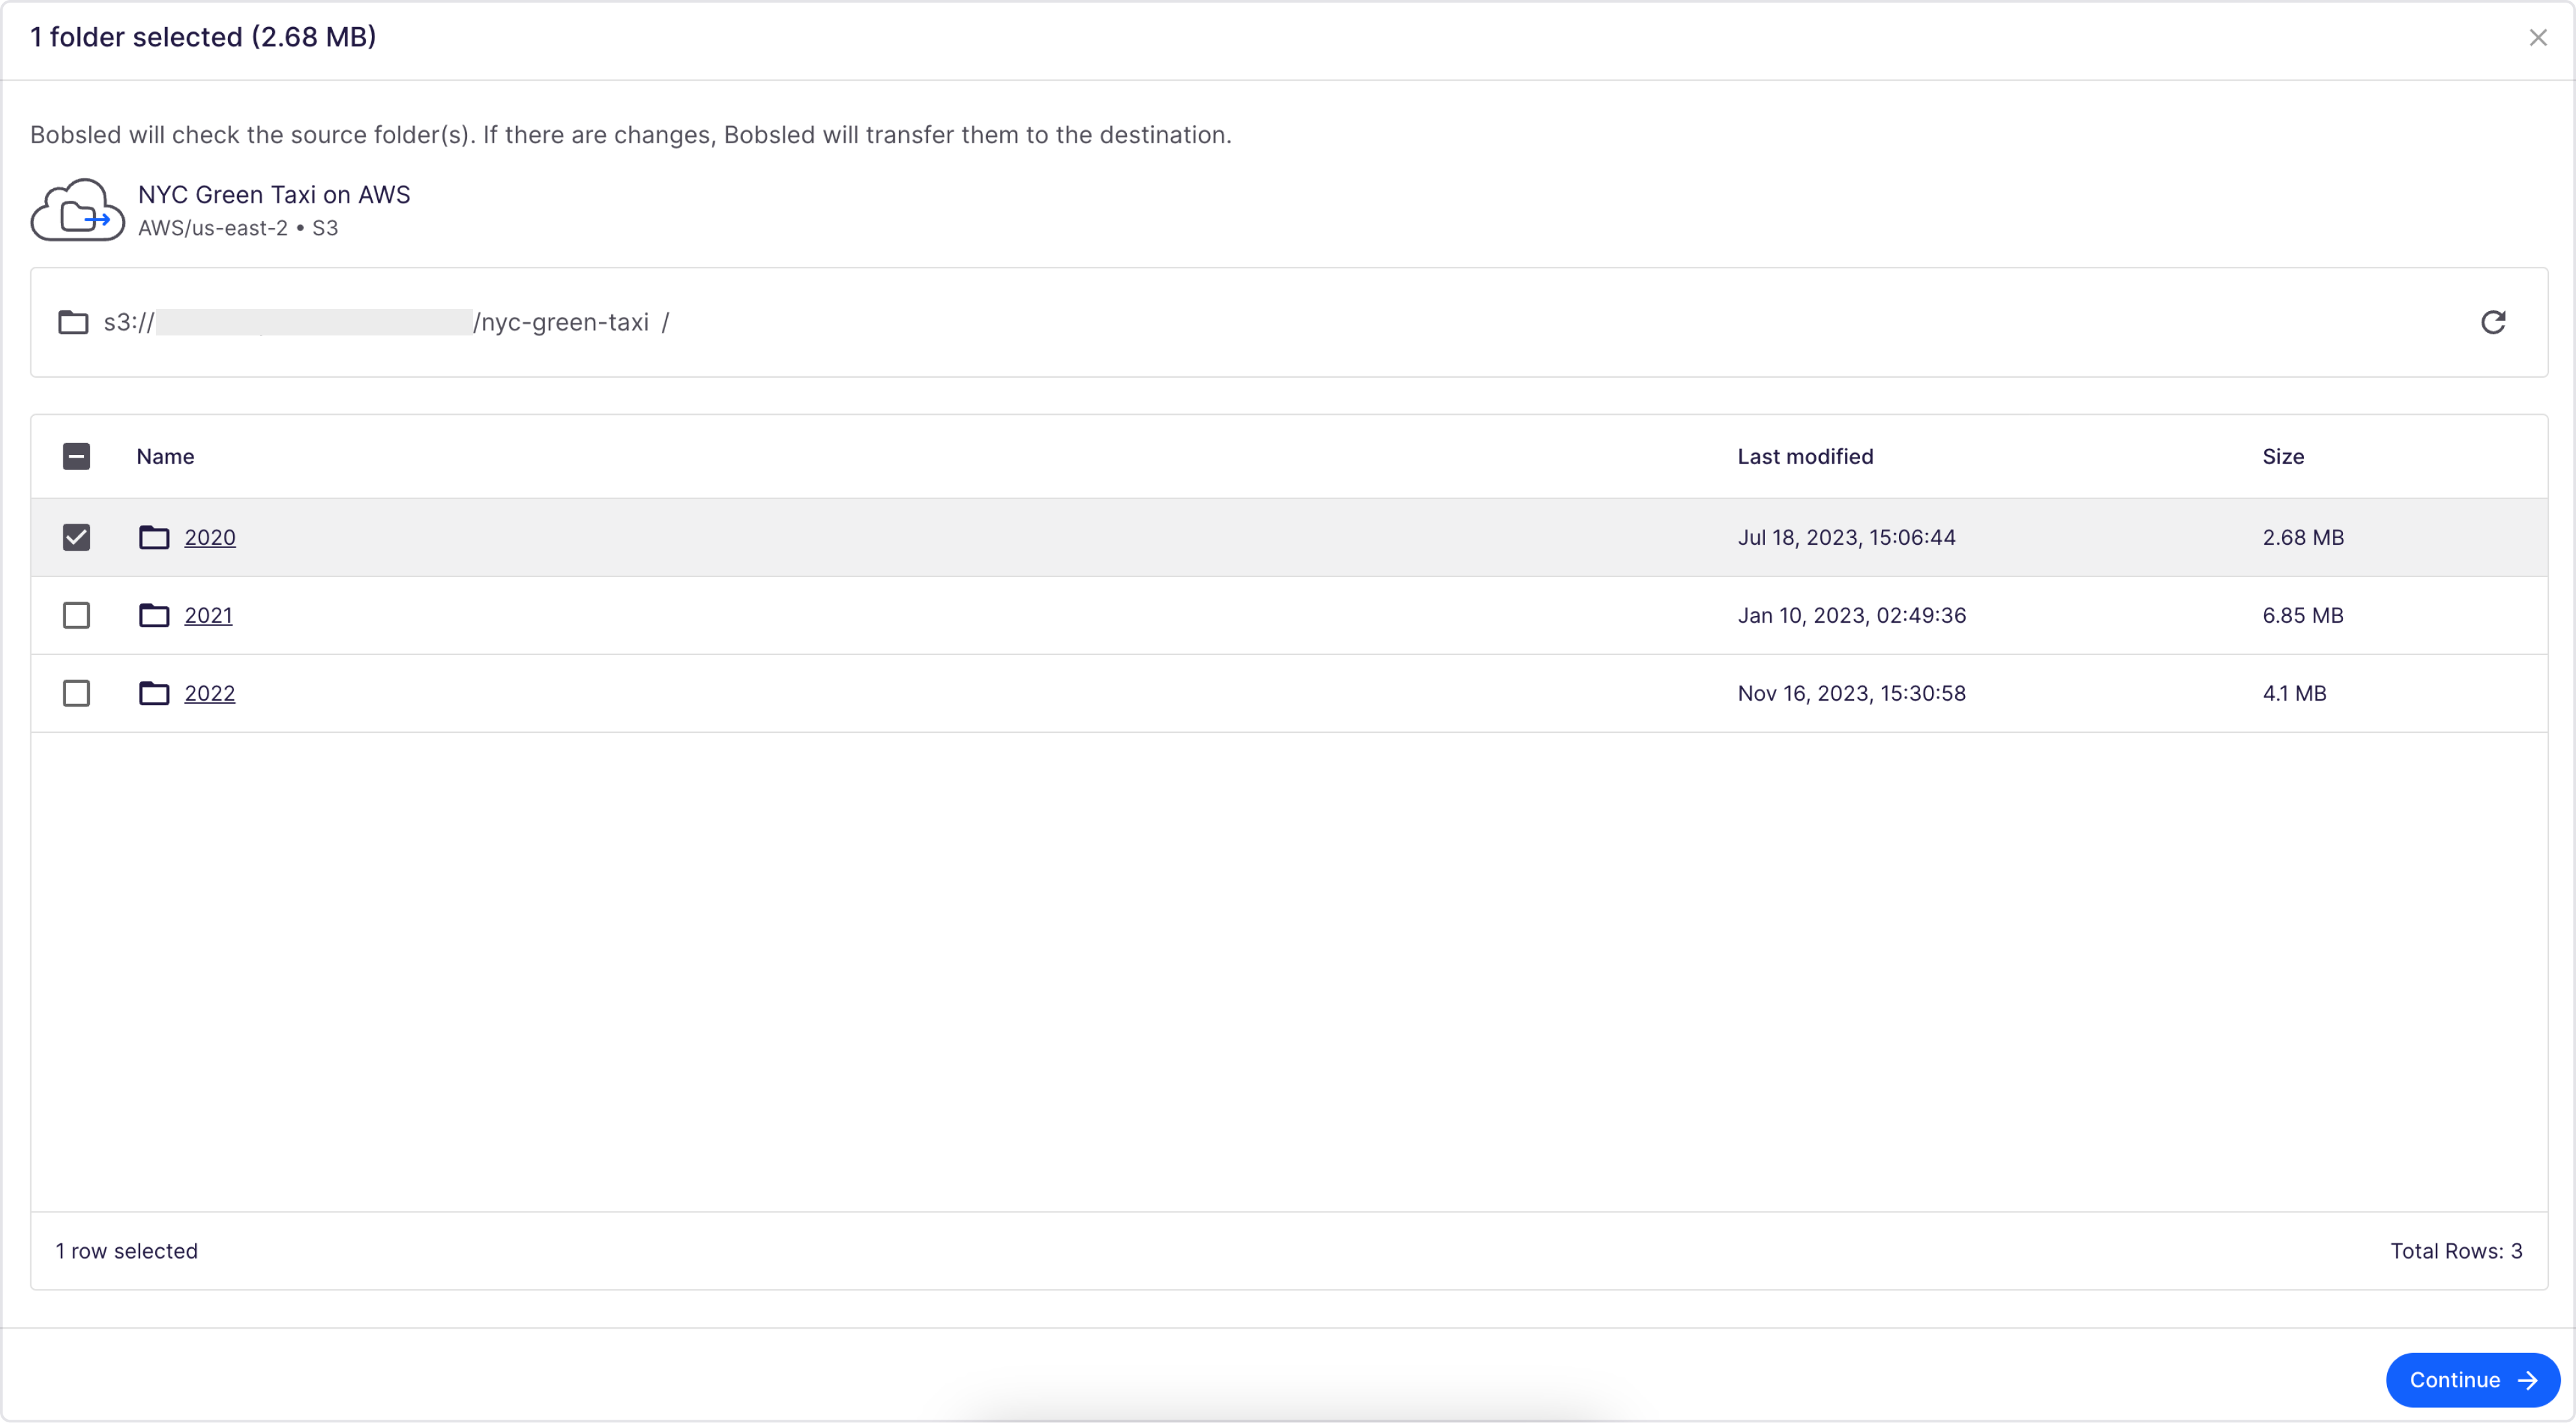
Select the source paths you want to share with a consumer.
Click the Create transfer button
Choose the source paths that you want to share
Optionally, set globs for more advanced selection
Once you have at least one path selected, click Continue
NOTE:
You can drill down on your paths for more granular selection, depending on your folder hierarchy. Bobsled seeks to replicate the source tables as a well-structured folder with files.
TIP:If you experience a delay between your source data and what Bobsled has indexed, click the refresh icon in this view.
Step 2: Configure tables for destination
Bobsled will map each source selection to a table in a given destination.
.png)
Bobsled will infer the file format and schema of your File Storage source selection
If the schema inference fails, you will be presented with an option to choose another file format or click the try again button to re-infer.
TIP:
If the issue persists, you may have conflicting formats, or the source folder may be empty. Please reach out to your account team so they can assist you.
Choose a loading pattern. By default, Bobsled sets the
Append onlypattern. Select the dropdown and choose the pattern best suited to your needs. Learn more about each loading pattern by following our Transferring files to Cloud Data Warehouse destinations guide.
TIP:
If the schema inference process hasn’t finished, you will not be able to complete setting up alternative loading patterns.
Optionally change the name of the destination table.
NOTE:
If you give a Destination table the same name for more than one path selection within a Share, these will be merged in the destination. In order to ensure it succeeds, these must share the same loading patterns and file type. The Bobsled Application will alert you if these conditions are not met.
TIP:Bobsled extracts the name based on your source selection, and will assist you with the correct naming format, providing feedback if some characters or formats aren’t accepted by the destination.
Optionally, click on View schema, and click on Advance settings to set Clustering keys for the destination table
Observe the schema Bobsled has inferred, translated into Bobsled data types, and optionally override it
Set clustering keys for the destination table. Please note that this will be applied differently by Cloud Data Warehouse destinations
Once done and no errors are observed, click on continue
Step 3: Review
Review the data transfer configuration.
.png)
Review your selection, schema, and data loading preferences
Optionally change the transfer interval and set it when it starts syncing, learn more in the Sync preferences and transfer scheduling guide
Click Save transfer
File Storage sources to File Storage destinations
When selecting data from your source, Bobsled will, by default, mirror the contents of your File Storage source and load it into the File Storage destination.
NOTE:
Bobsled doesn’t support File storage sources to File to destination loading configurations. Learn more in Transferring files to file storage destinations.
Step 1: Choose data
Select the source paths you want to share with a consumer.
Click the Create transfer button
Choose the source paths that you want to share.
Optionally, set globs for more advanced selection
Once you have at least one path selected, click Continue.

NOTE:
You can drill down on your paths for more granular selection, depending on your folder hierarchy. Bobsled seeks to replicate the source tables as a well-structured folder with files.
TIP:If you experience a delay between your source data and what Bobsled has indexed, click the refresh icon in this view.
Step 2: Review
Review the data transfer configuration.
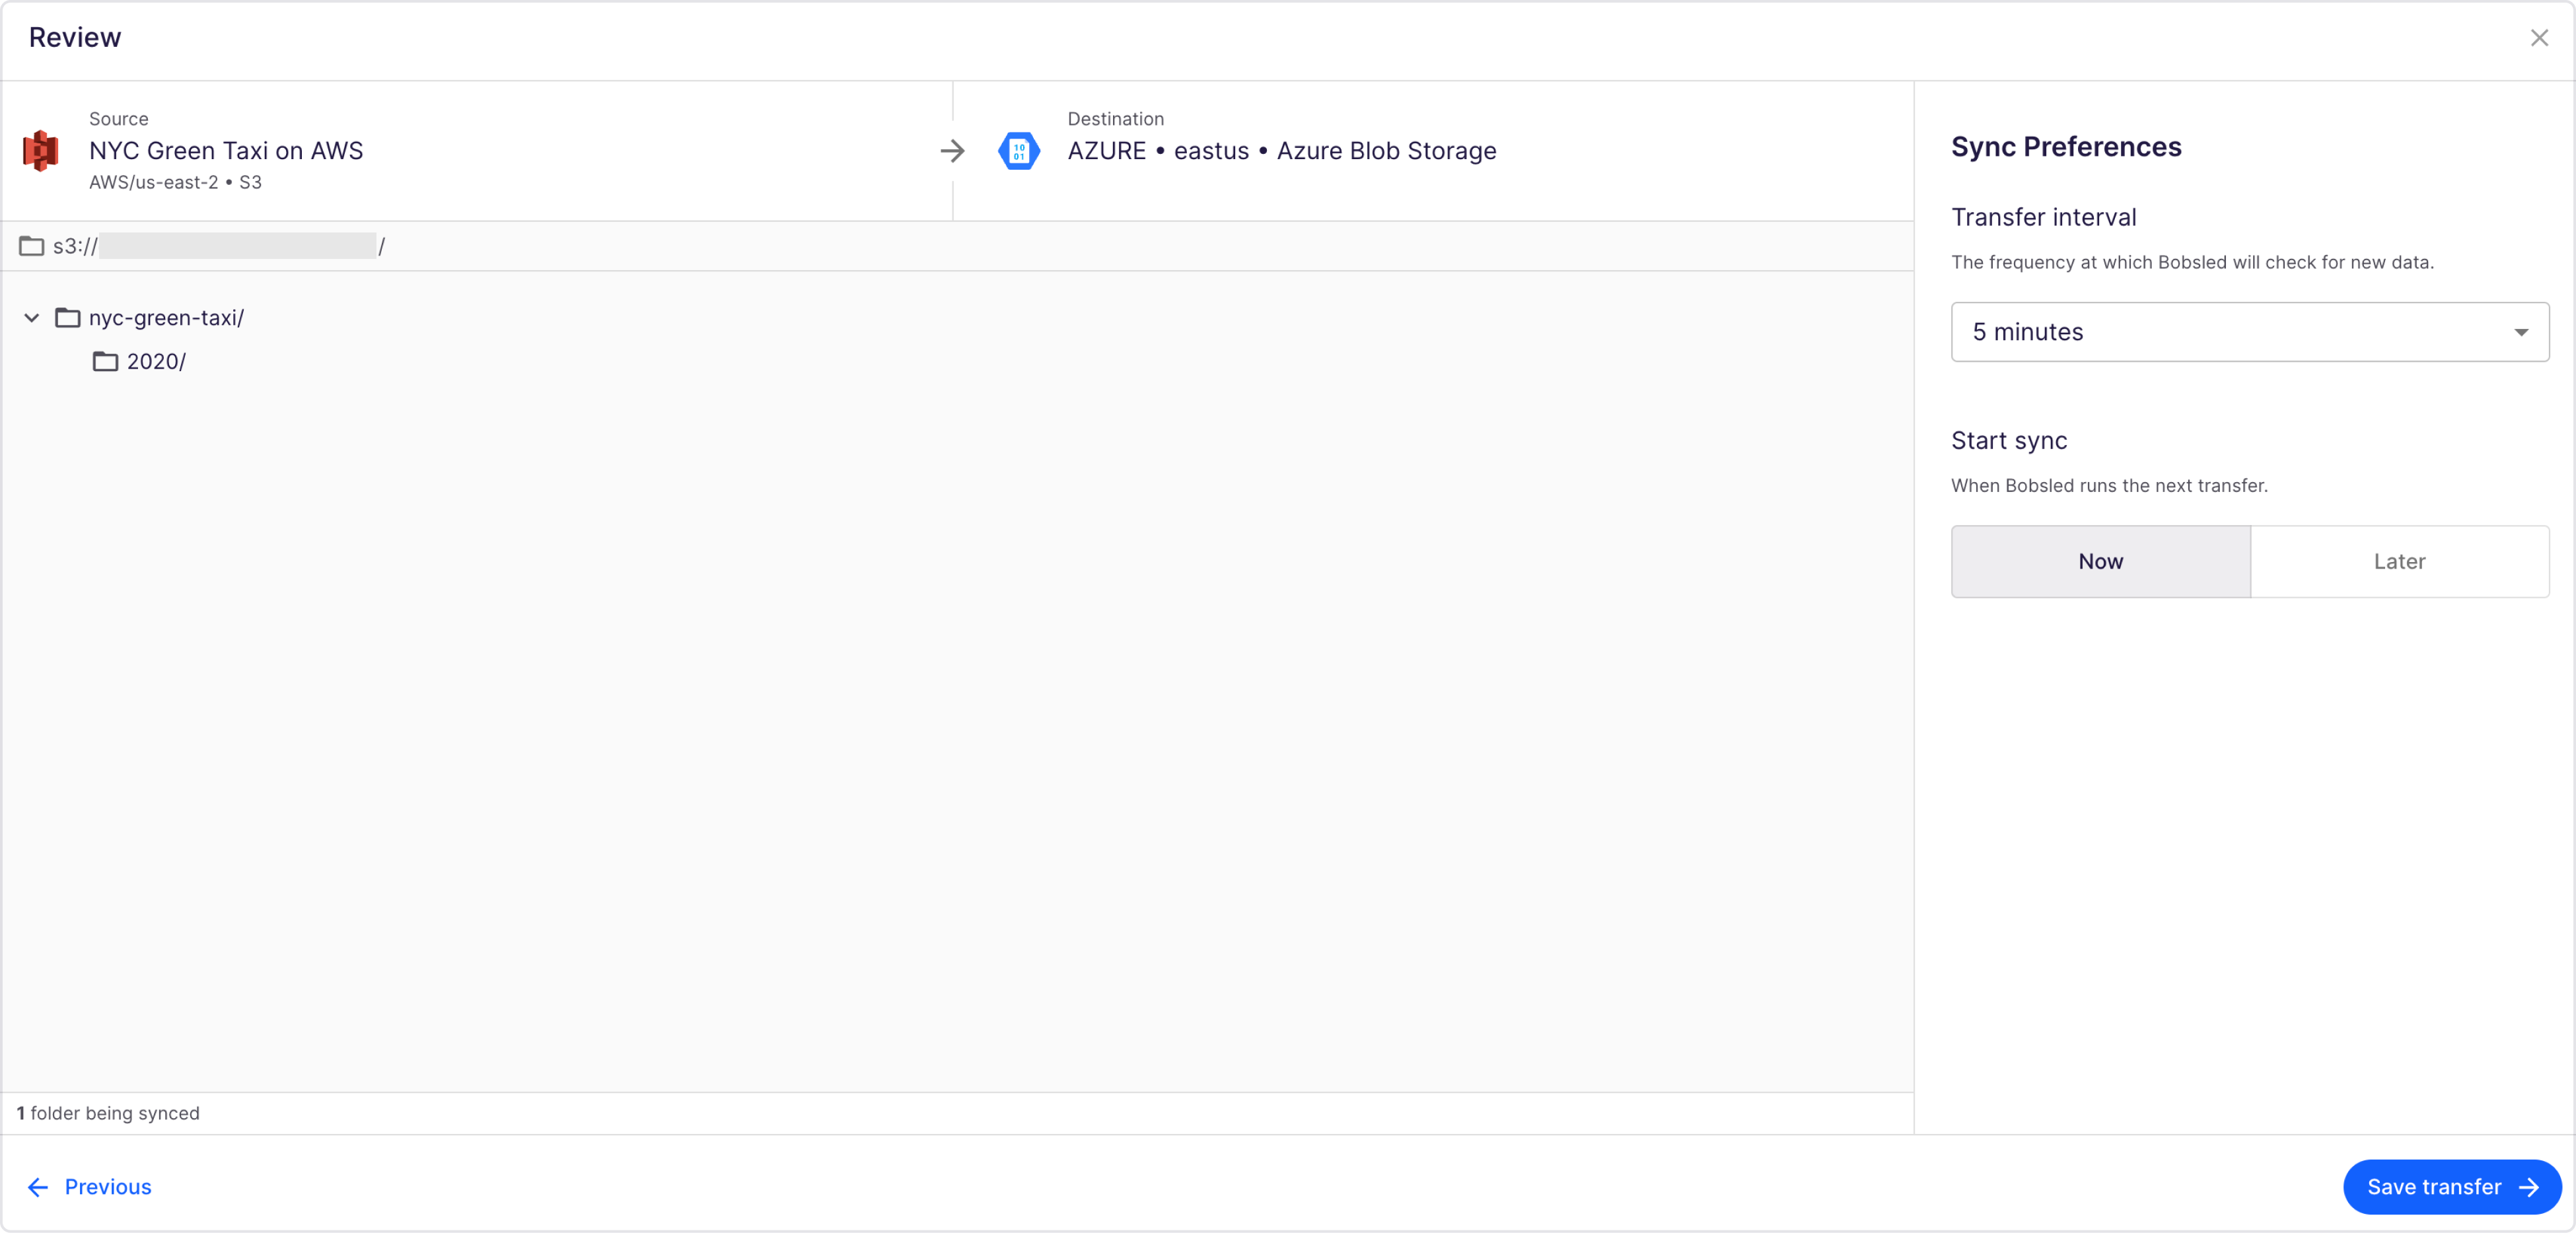
Review your selection, schema, and data loading preferences
Optionally change the transfer interval and set it when it starts syncing, learn more in the Sync preferences and transfer scheduling guide
Click Save transfer
Cloud Data Warehouse sources to Cloud Data Warehouse destinations
When selecting data from your source, Bobsled will take each unique object selection and map it into an individual table.
Bobsled generates the default name of the table based on your source selection. E.g.,
SNOWFLAKE_DATABASE.SNOWFAKE_SCHEMA.TABLE_2020will translate into one table, namedtable_2020
Step 1: Choose data
Select the source objects you want to share with a consumer.
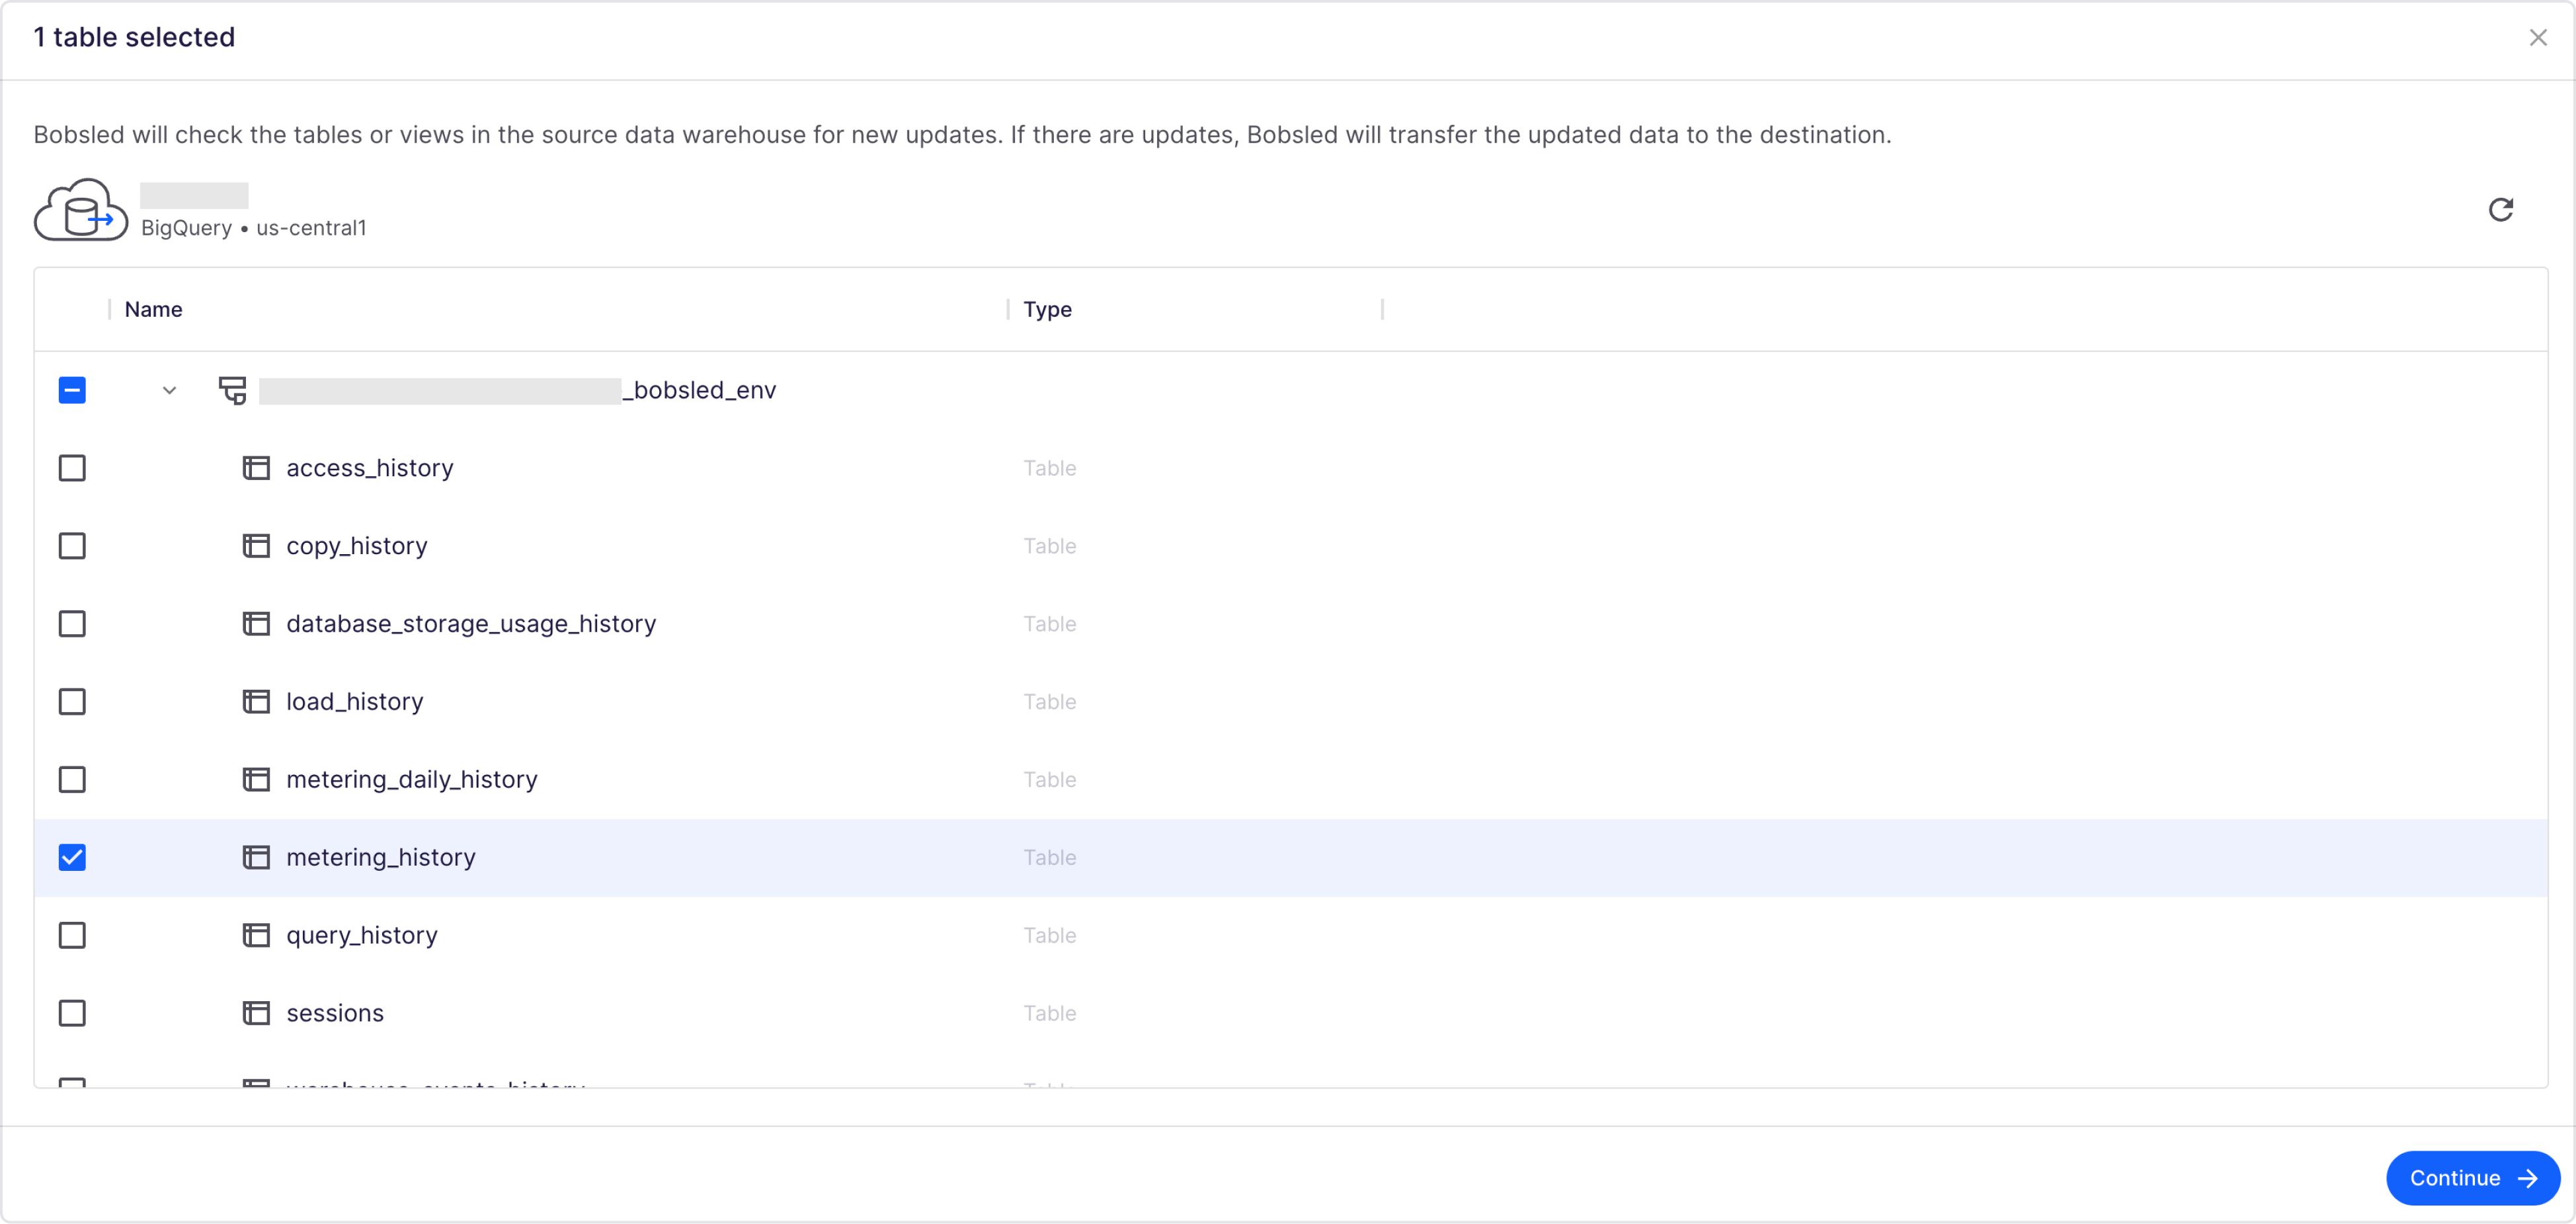
Click the Create transfer button
Choose the source objects that you want to share.
Once you have at least one object selected, click Continue.
Step 2: Configure tables for destination
Bobsled maps 1:1 your source objects to tables in the destination.
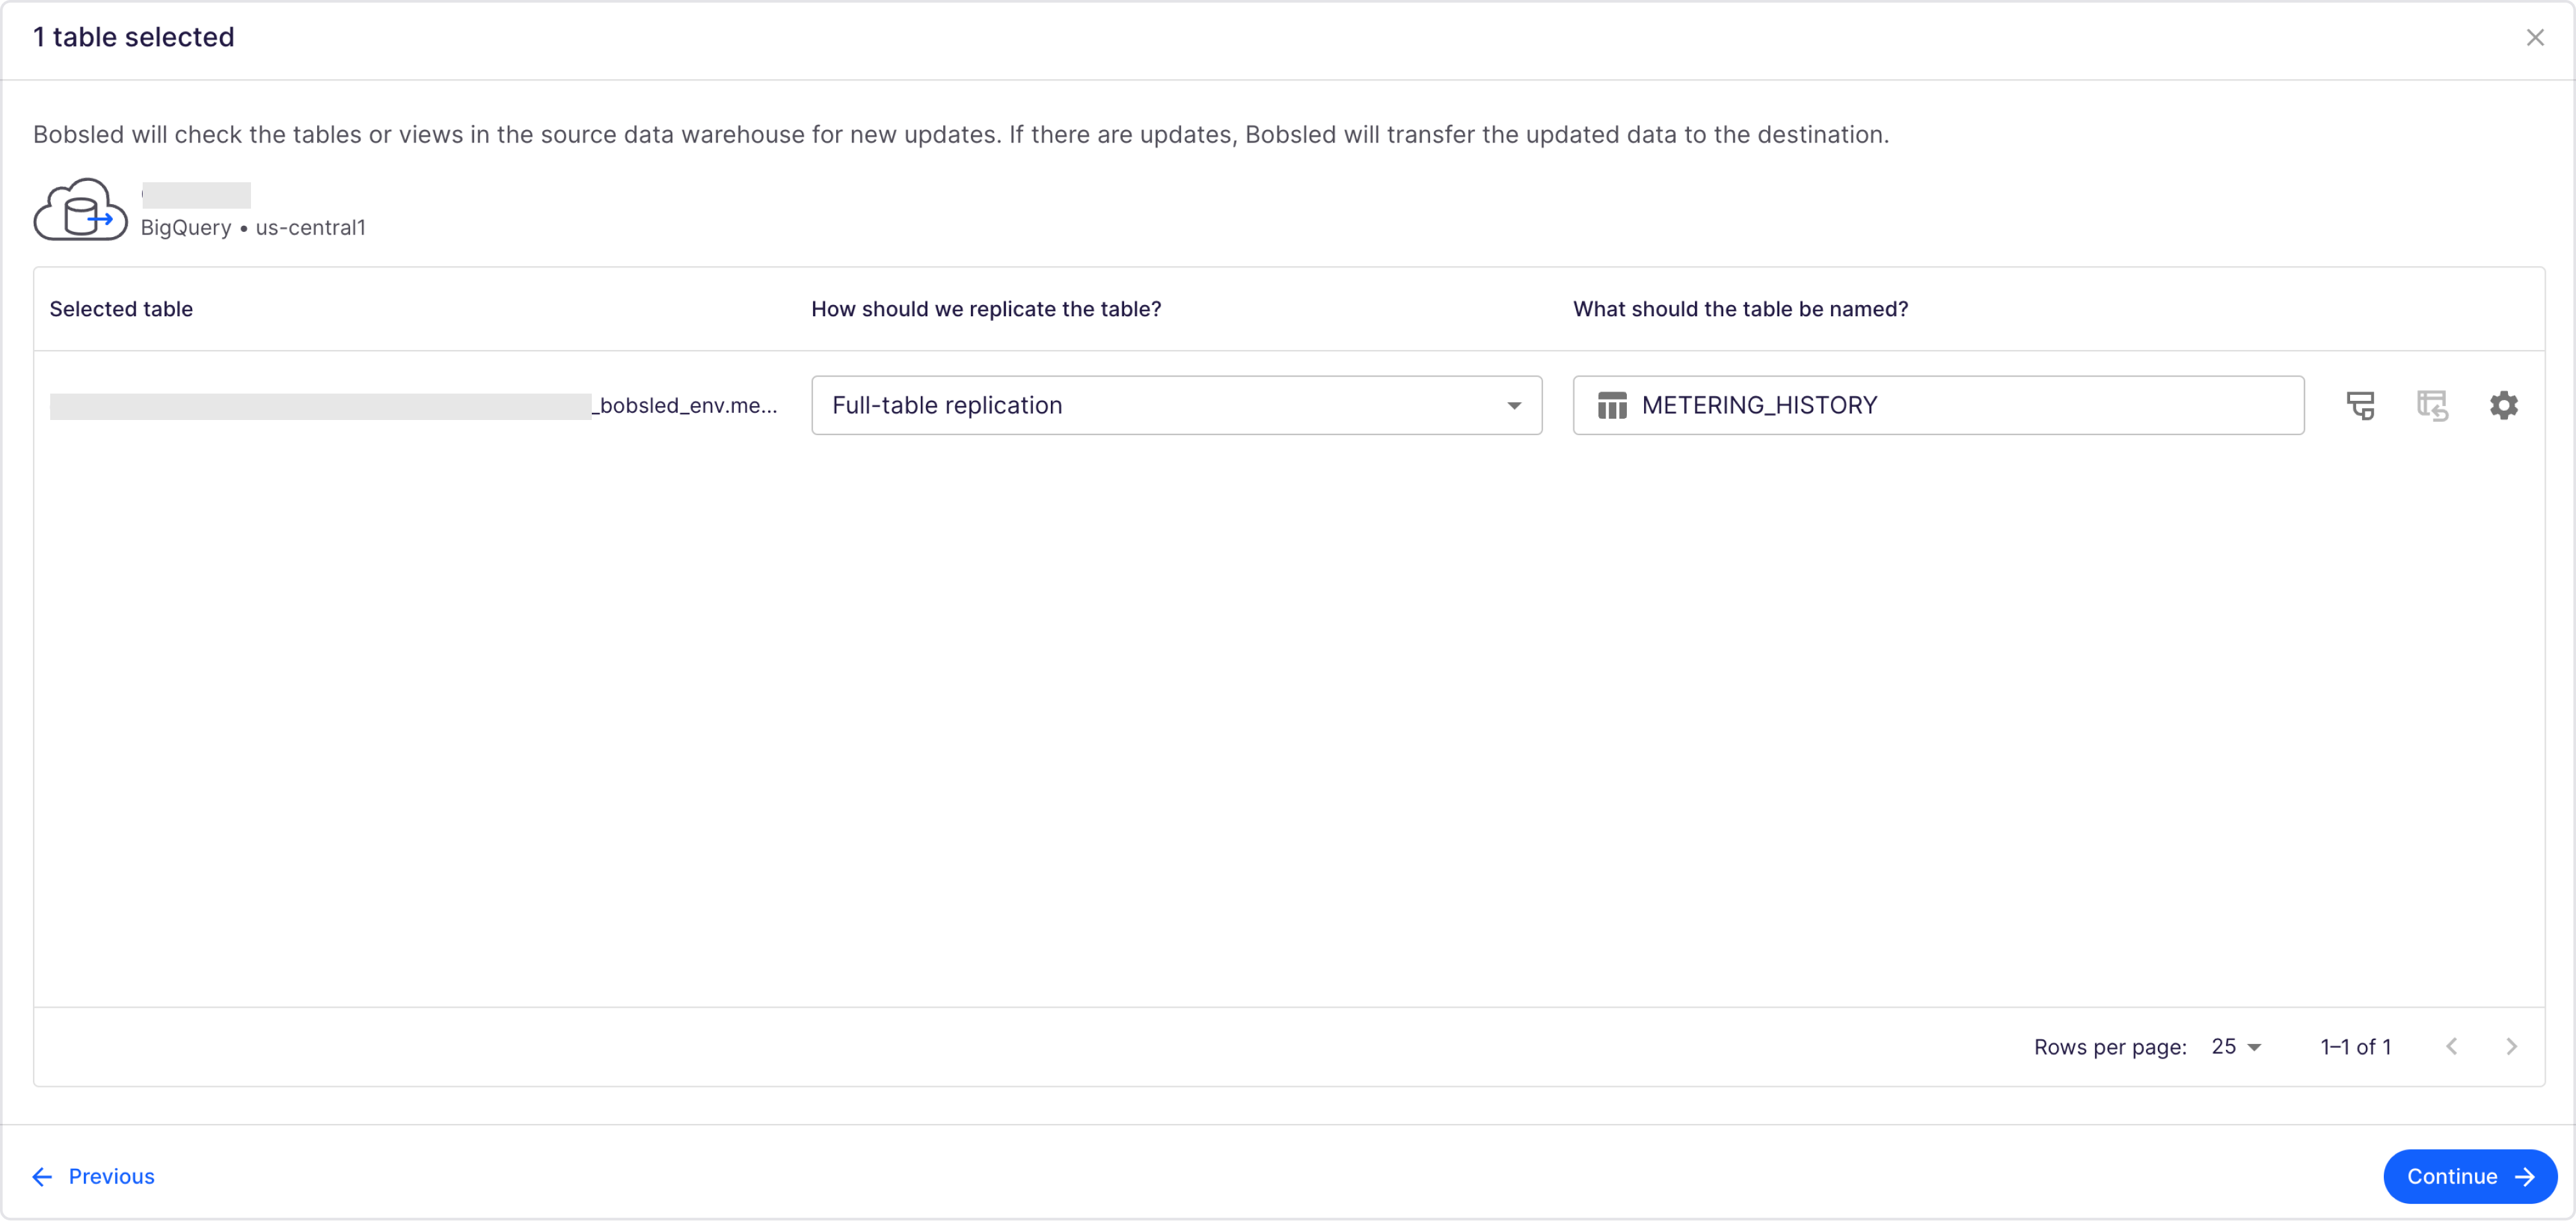
Choose a loading pattern. By default, Bobsled sets the
Full-table replicationpattern. Select the dropdown and choose the pattern best suited to your needs. Learn more about each loading pattern by following our Transferring tables to Cloud Data Warehouse destinations guide.Optionally change the name of the destination table.
NOTE:
Bobsled extracts the name based on your source selection, and will assist you with the correct naming format, providing feedback if some characters or formats aren’t accepted by the destination.
Optionally, click on View schema, set a back-fill, and click on Advance settings to set Clustering keys for the destination table, or Backfill segmentation options for large source tables
Observe the schema Bobsled has inferred, translated into Bobsled data types, and optionally override it
The first load is effectively a back-fill, this interaction will be disabled in the first sync of your transfer. Learn more
Set clustering keys for the destination table. Please note this will be applied differently by Cloud Data Warehouse destinations
Set Backfill segmentation to ensure your large-volume tables are being transferred with confidence
Once done and no errors are observed, click on continue
Step 3: Review
Review the data transfer configuration.
.png)
Review your selection, schema, and data loading preferences
Optionally change the transfer interval and set it when it starts syncing, learn more in the Sync preferences and transfer scheduling guide
Click Save transfer
Cloud Data Warehouse sources to File Storage destinations
When selecting data from your source, Bobsled will take each unique object selection and map it into an individual folder.
Bobsled generates the default name of the folder based on your source selection. E.g.,
SNOWFLAKE_DATABASE.SNOWFAKE_SCHEMA.TABLE_2020will translate into one folder, named.../table_2020/
Step 1: Choose data
Select the source objects you want to share with a consumer.

Click the Create transfer button
Choose the source objects that you want to share.
Once you have at least one object selected, click Continue.
Step 2: Configure folders for destination
Bobsled maps 1:1 your source objects to folders in the destination.
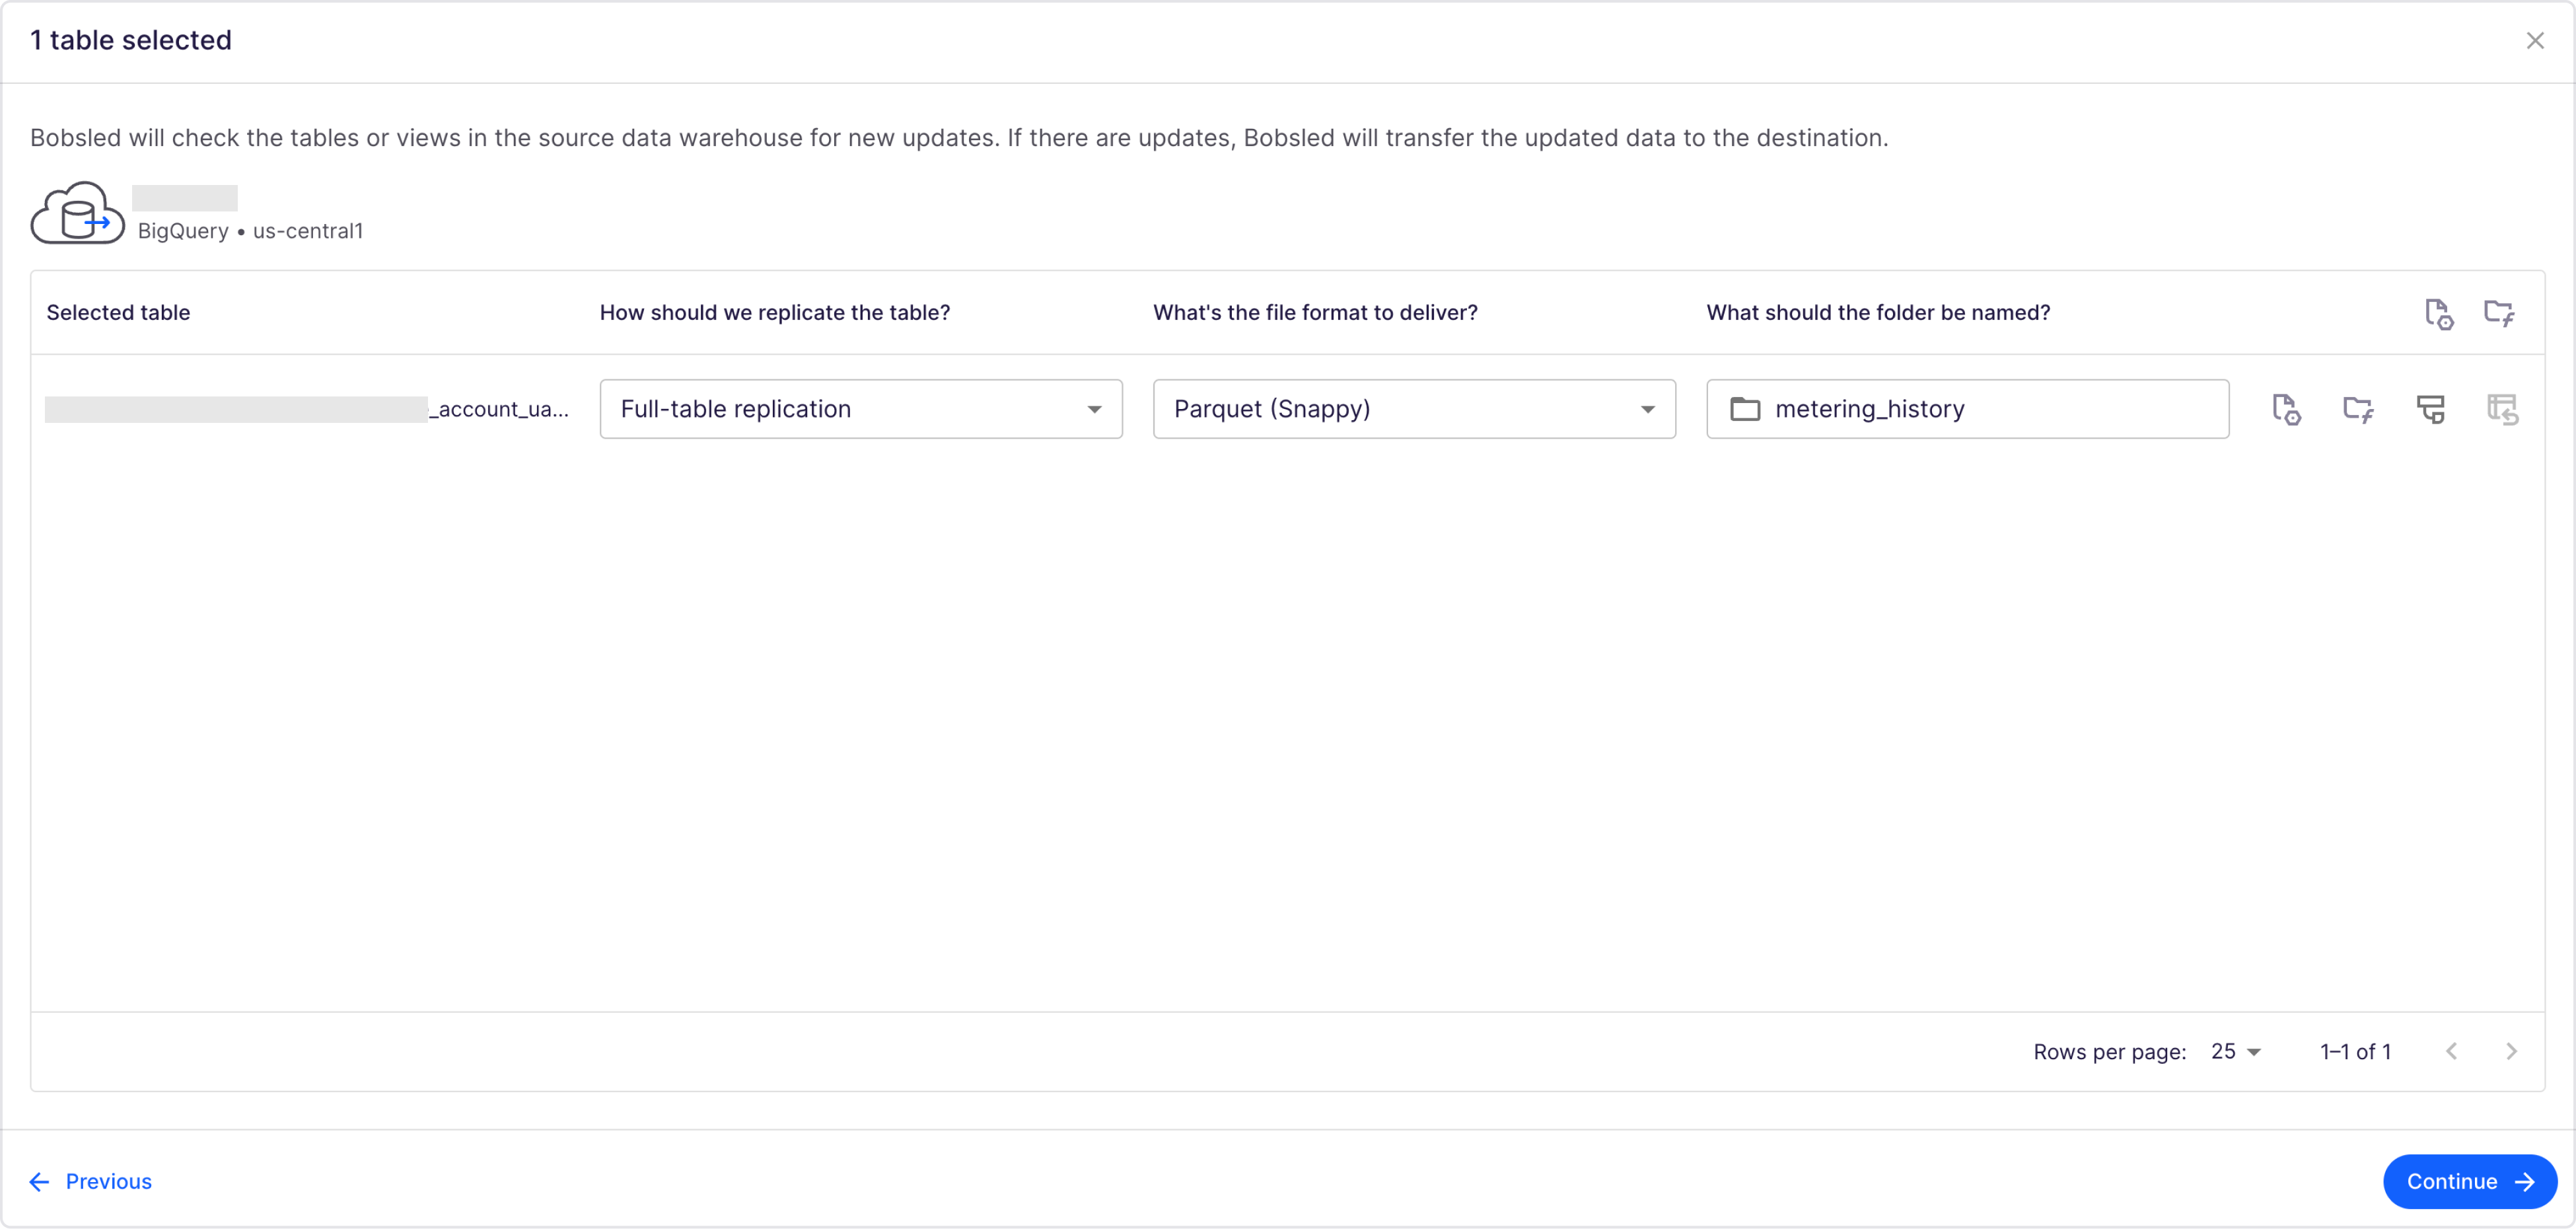
Choose a loading pattern. By default, Bobsled sets the
Full-table replicationpattern. Select the dropdown and choose the pattern best suited to your needs. Learn more about each loading pattern by following our Transferring tables to file storage destinations guideChoose format. By default, Bobsled sets the option Parquet (Snappy). Learn more about which formats are supported.
Optionally change the name of the destination folder
NOTE:
Bobsled extracts the name based on your source selection, and will assist you with the correct naming format, providing feedback if some characters or formats aren’t accepted by the destination.
TIP:You can change your default file format by following the sidebar and clicking on Environment, scroll down to Data delivery preferences and click on the edit (pencil) icon next to File format default.
Optionally set File format and Data Delivery preferences; View schema, and set a back-fill.
Configure the file format in which Bobsled writes to the destination.
Configure how Bobsled writes to the destination bucket. Learn more about the folder structure.
Observe the schema Bobsled has inferred.
The first load is effectively a back-fill, this interaction will be disabled in the first sync of your transfer. Learn more.
Once done and no errors are observed, click on continue
Step 3: Review
Review the data transfer configuration.
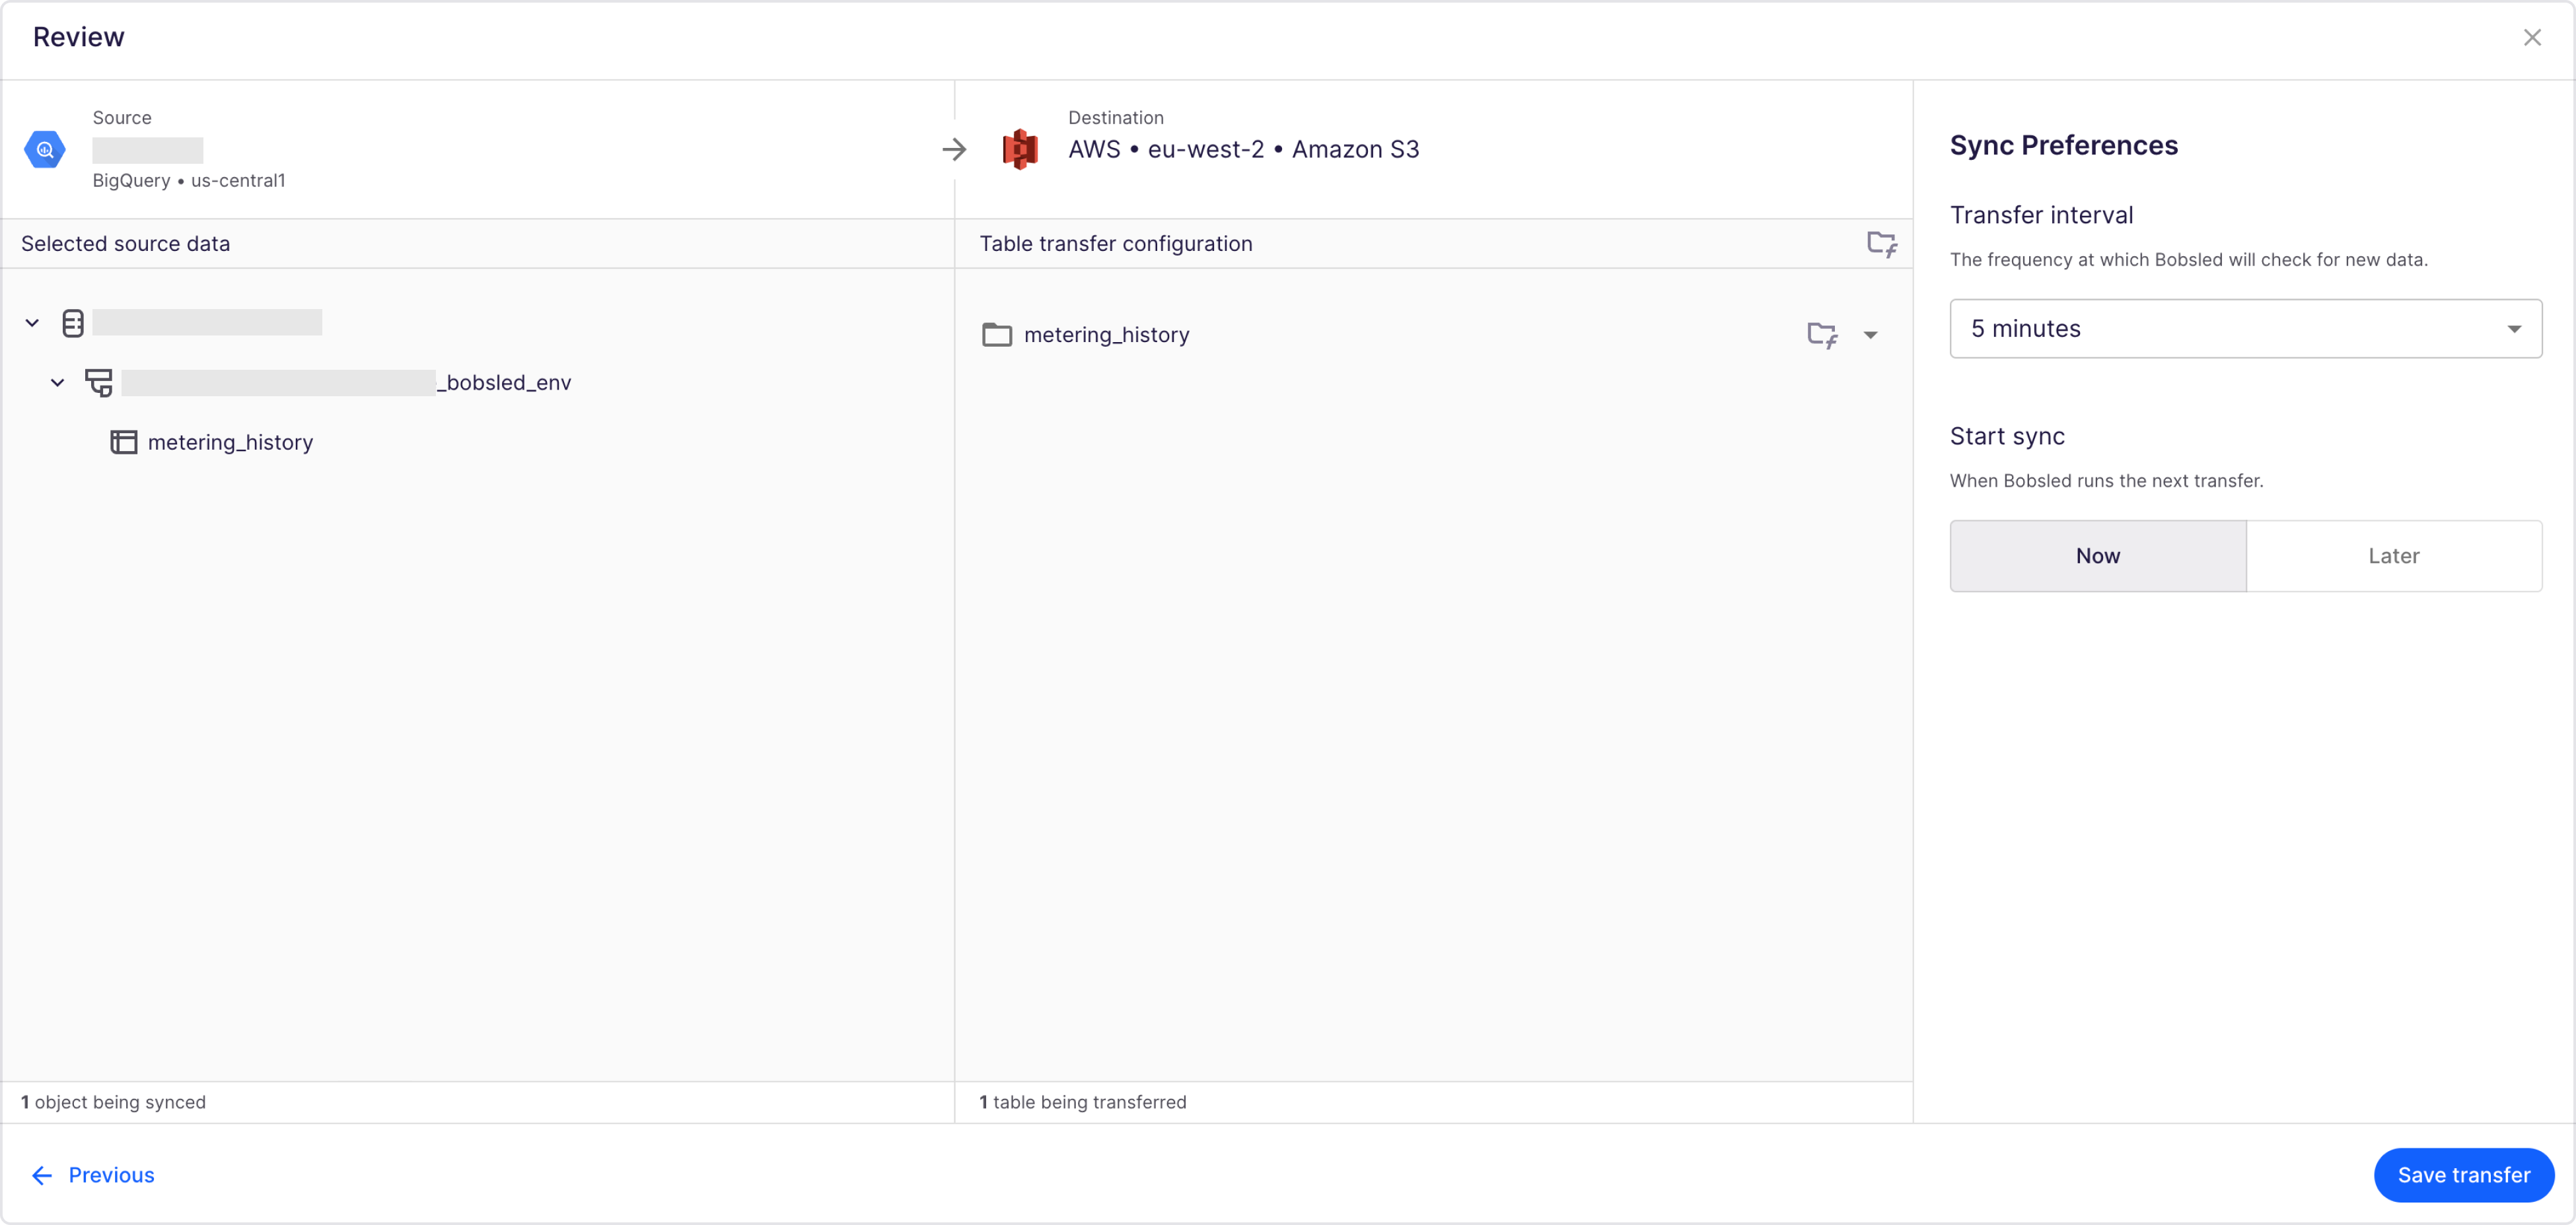
Review your selection, schema, and data loading preferences
Optionally change the transfer interval and set it when it starts syncing, learn more in the Sync preferences and transfer scheduling guide
Click Save transfer
Manage a data transfer
After the first data transfer has been set up, you will be provided with more information available at a glance:

Transfer ID: Unique identifier for the data transfer.
Details about:
Total number of entities being transferred
Last edit date and who was the author of the edit
Transfer status: In-detail information about the status of the Data transfer
Access data button: Instructions on how to access the data. Check the Destinations guides on how to consume a data transfer
NOTE:
The Access data button is only available after the first sync.
More (ellipsis) button:
Edit: Make changes to the data transfer. The data transfer must be paused to edit.
View transfer configuration: Renders a modal with information about the data transfer configuration, as outlined in the review steps above. If sharing to a cloud data warehouse destination, you can view the schema
Additionally, Bobsled offers details and controls about the transfer:
Transfer interval: Displays what is the transfer interval set
Pause transfer: Bobsled will not run any new syncs
If the transfer is paused, the Resume transfer button is shown instead
Sync now: Bobsled will trigger an ad hoc data transfer, with no interference on any transfer intervals
NOTE:
You cannot force a Sync now if there is data currently being transferred.
Pause a data transfer

Click on the Pause transfer. It will suspend the transfer sync interval, and no new transfers will happen automatically.
To resume the transfer sync interval, click on Resume transfer

NOTE:
Clicking Sync now on a paused data transfer will trigger a sync. This will not resume the transfer interval schedule.
Edit a data transfer
To edit, you must first pause the data transfer.
In the Share detail page, click Pause transfer
Click on the more (ellipsis) button, and then click edit

Perform the desired changes, follow the wizard, and click Resume transfer
Monitoring a data transfer
Once a data transfer has started, Bobsled now offers information at a glance about the objects being transferred, including the data loaded in the destination. Depending on the type of source and destination type, some details may vary by combination of source and destination type.
DATA TRANSFER STATUS PUBLIC PREVIEW (April 2025)
Feature is in public preview. It is suitable for certain production workloads but may not be appropriate for all use cases. For guidance, contact your account representative.
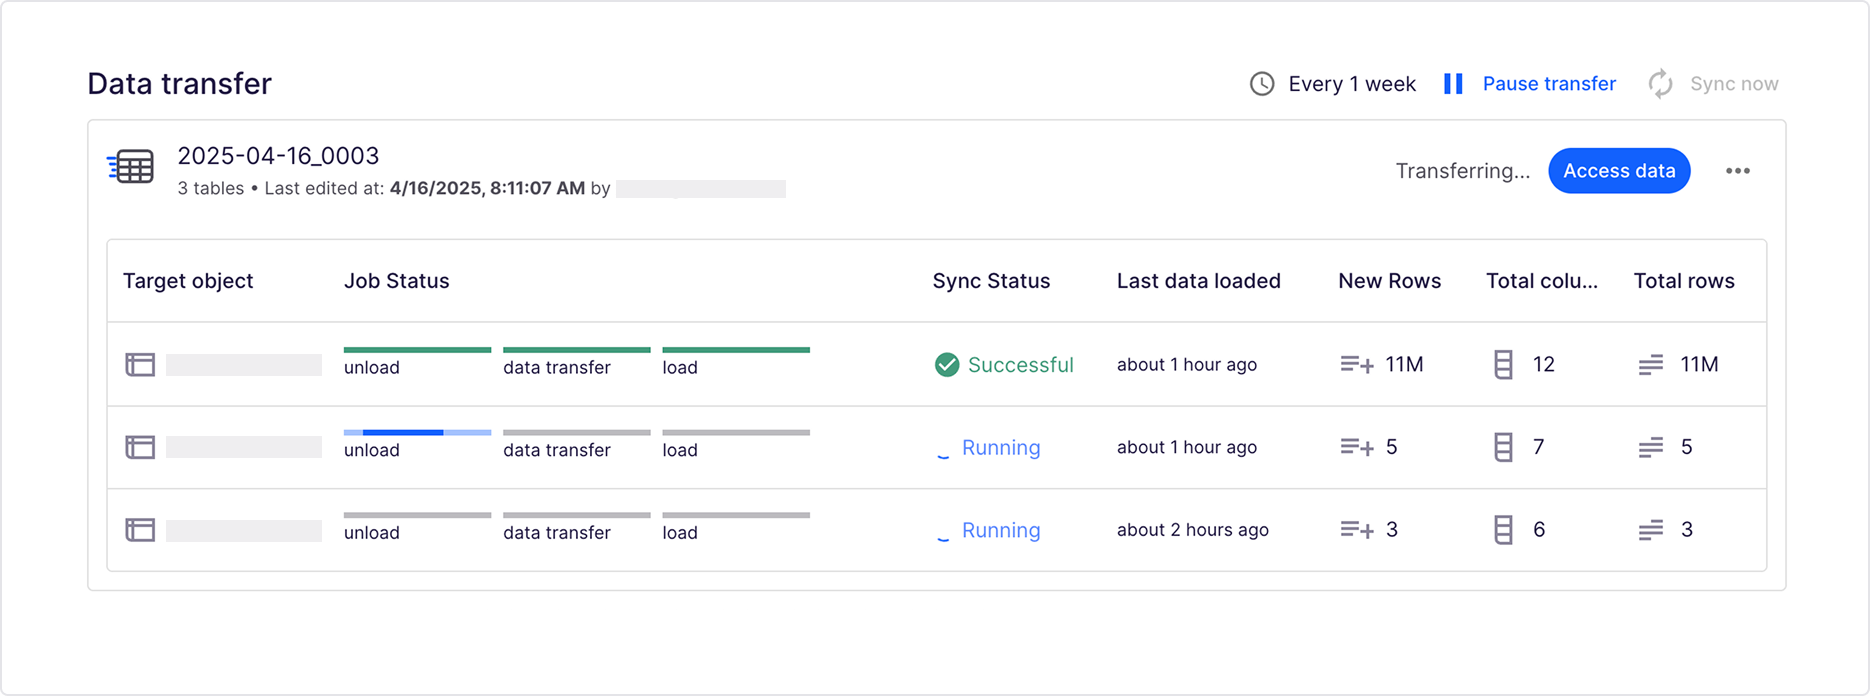
In the transfer status list, Bobsled offers at a glance:
Target object: The configured name for the object—table or folder—in the destination.
Job status: A breakdown of progress while the transfer is currently syncing. The steps in the job column vary slightly depending on the source and destination combination, but provide a visual breakdown of its status. These can also be observed through the logs.
Sync Status:
Running: Currently syncing.
Successful: The sync has been successful.
Failed: The object failed to transfer during the last sync.
Skipped: No new data has been identified in the source.
Last data loaded/transferred: The last time data has successfully been transferred to the destination.
Varies by destination:
For Cloud Data Warehouse destinations:
New rows: The amount of rows added in the last successful data load
Total columns: The number of columns for a given table already loaded and available in the destination.
Total rows: The number of rows for a given table already loaded and available in the destination.
For File storage destinations:
Last transferred size: The volume in bytes of the last transfer.
Total size: Total bytes historically transferred (excludes any deleted data).
NOTE:
For transfers between File storage sources and destinations, Bobsled doesn’t currently discriminate the individual selected and loaded paths.
Troubleshooting a data transfer
When a data transfer fails, Bobsled will relay details about the error or warning. Hover the error or warning message for more details and how to recover.

NOTE:
Bobsled will render the Failed status, regardless of the data transfer being paused on actively scheduled.
Transfer restrictions
The maximum transfer size is 400,000 files
The maximum number of tables transferred in one automation is 800