This guide will describe the steps for a Provider to grant Bobsled access to an SFTP server to be used as a source in Bobsled.
Prerequisites
To configure Bobsled access to your SFTP server, ensure that you have administrative access to manage user accounts and permissions on the SFTP server.
Also, this guide assumes that you have a working SFTP server already set up for your organization.
Setup instructions
Bobsled requires an SFTP user account with the appropriate permissions to access the necessary directories and files. You can either:
Create a dedicated user for Bobsled manually (recommended) or,
Use an existing user account with proper permissions, or
Authenticate via SSH
Option 1: Creating a Dedicated SFTP User for Bobsled
To ensure secure access and limit Bobsled's permissions to only the required files, creating a dedicated user account for Bobsled is recommended.
Step 1: Create an SFTP User
Log in to your SFTP server with administrative privileges.
Create a new user specifically for Bobsled.
Ensure the user has a unique username and a strong password
Assign the user a home directory or specify the directories where Bobsled will access files.
Make sure this user has restricted access to only the directories required for Bobsled operations.
Step 2: Set Permissions for the Bobsled User
Grant read permissions to the directories and files that Bobsled needs to access.
This includes the ability to list directory contents and download files.
Verify access by testing the user’s ability to log in and access the specified directories and files.
Option 2: Using an Existing SFTP User
If you prefer to use an existing user account, ensure the following:
The user has read permissions to the required directories.
You have the login credentials for the user.
The user’s access is restricted to only the necessary files and directories.
Last step: Finish source configuration in Bobsled
Once you’ve set up the SFTP user, you can configure the source in Bobsled:
From the Bobsled dashboard, navigate to Data Sources.
Click Add Source.
Enter a name for the SFTP source (e.g., "Company SFTP Server").
Select SFTP as the source type.
Click Continue to move to the next step.

Enter the SFTP server details:
Host: The IP address or domain name of your SFTP server.
Path: The directory path where Bobsled will read files. If not provided, it’ll be the user’s home directory
Username: The username of the SFTP account created or selected for Bobsled.
Password: The user’s password.
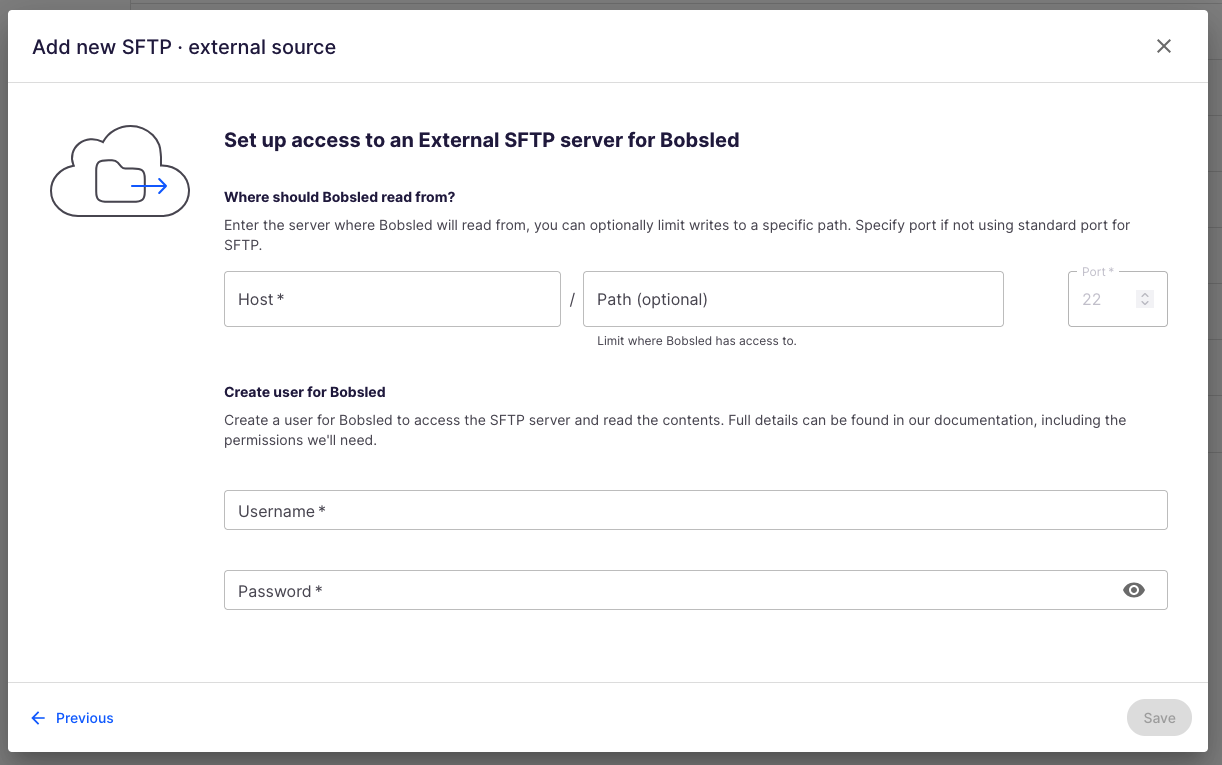
Click Save to complete the setup.
Option 3: SSH Key Authentication
To securely connect Bobsled to your SFTP server via SSH key, follow these steps:
In the Bobsled UI, enter your SFTP Host and optional starting directory, then choose SSH Key. You will be guided through the following steps:
Click Save in the Bobsled UI.
Bobsled will generate a unique Username and public SSH key.
In the Bobsled UI, return to the source setup page and continue to the SSH keys screen.
Copy the Public SSH Key generated by Bobsled.
Your SFTP administrator must add this key to the server’s list of authorized keys.
After setup, Bobsled will automatically handle authentication and complete the source connection.
Once you’ve successfully configured your Source, you can add it to a Share, choose a Destination, and a create a transfer to start sharing your data.